Share
Pin
Tweet
Send
Share
Send
To make a notebook we take:
• Two binding cardboards A4 format;
• Printed sheets A4 format with different pages;
• Fabric with stars on a red and yellow background, dense cotton of good quality;
• Sintepon;
• Adhesive tape effect and double-sided tape;
• Picture with Mi Bunny;
• Card with the inscription "Our little princess" (in Ukrainian);
• Napkins pink and beige from felling, flags, pink butterflies;
• Scrapbook paper 30 * 30 cm in size, three sheets: two in pink and one in yellow;
• Beige wide lace;
• Curb hole punch;
• Eyelets of red color;
• Grommet installer;
• Scissors, ruler, simple pencil;
• Satin ribbon of peach color 25 mm wide;
• Glue stick;
• Beige ribbon with fabric roses;
• Brads metal plain and epoxy in a yellow frame;
• Ink pad.
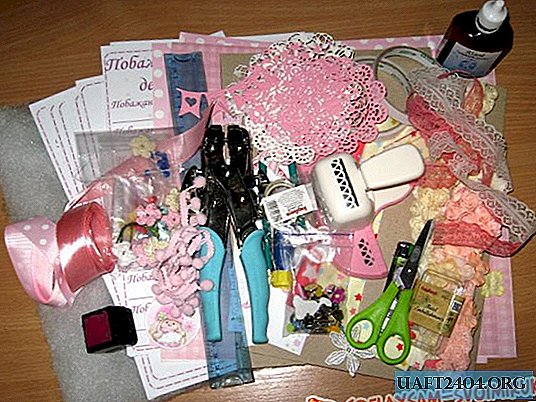

We start by making a paperback for the album. To do this, take the binding sheets of cardboard, glue the strips of double-sided tape and glue the synthetic winterizer sheets.


Now we need to wrap both blanks with a cloth. To do this, cut two pieces of red fabric with stars and two pieces of yellow fabric.


The fabric needs to be ironed well under steam. We will sew on a strip of lace at the stitching sites. With the fabric so far finished, prepare the sheets of the album.


We cut the sheets, they should be slightly smaller than the cover. It turns out we have a size of 20 * 29 cm. We take two sheets.


We glue the strips of double-sided tape on one behind, put another sheet on top and glue it. The sheets are immediately folded and glued alternately in the sequence in which you need. Now all the sheets in pairs as glued sew.


We sew fabric and sew wide lace at the joints. Now we put the fabric on it blank and smear the corners.


Wrap the corners and glue.


Now we smear the top and bottom, and then the sides. Wrap everything gently, pull it on and glue it.


Glue strips of tape from the inside to the center of both blanks. This we will have a bow with which we will tie the album.


Cut the yellow paper 14 * 20 cm in size, take two napkins, a picture and a card. We tint a card and a picture with a small pillow.


Sew the edges of both blanks along the edge, sew the paper, then glue the napkins and sew the picture with the card. Now insert the flowers with brads.


Now the inner sides of the covers need to be pasted over with scrapbook paper.


We cut two rectangles of 20.5 * 29 cm. Glue a pocket on one piece and sew it. Now we glue both rectangles with glue from the inside of both covers.


Now put three marks.


We make three holes with the help of the installer and put eyelets on it.


Now we apply this cover to another, we also put the labels in the same places and put the grommets too.


Now we need to guess with the holes and the sheets. We take one sheet, put the cover on it and mark it, then make holes on the sheet. And already on this sheet we make marks on the rest and the corresponding holes.


Now you need to string everything on the rings. We dress the rings on the bottom of the cover, then alternately put the sheets on.


We put on the cover on top and fasten the rings.


Now we tie the album to the bow and decorate it.


We got such a juicy and bright album for the girl in her first year of life. Grateful for your attention and good luck!


Share
Pin
Tweet
Send
Share
Send

