Share
Pin
Tweet
Send
Share
Send
Materials for work:
• Old beam 10 x 15 in size - 4 heights of table legs;
• 40 mm thick board - 2 widths + 2 tabletop lengths;
• Edged board - 1 pc. 5 meters long;
• Nails 120 mm long - 16 pieces;
• Nails 40 mm long - 20 pieces;
• Saw, hammer, brush, paint.
Stages of the work:
The first stage: we form the basis.
We take an old window sill, a bar, a couple of thick boards. To give stability to the future table in this master class, a block and an old window sill were used. The window sill is comfortable with already cut notches. But it can easily be replaced with a bar and use only it.

On the windowsill, measure out 65 centimeters.

We saw off two parts, each of which is 65 centimeters long.


The legs of the future table are made of timber, on which we measure 60 centimeters.

We saw off two parts of the same length.

We install pieces of the windowsill - the basics at a small distance from each other. Having made a small indent from the edge of the base, on the sill of the windowsill we install a leg - a beam.

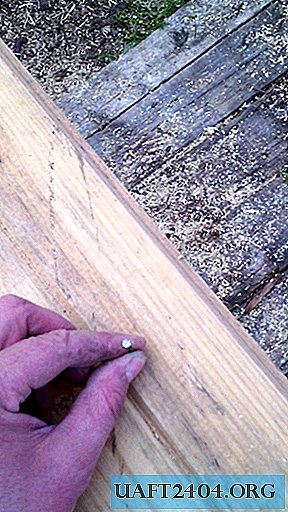
We drive into the leg - a bar over a nail (120 mm long) on each side, connecting the joints of the leg with the parts of the window sill. We drive in the nails at an angle (obliquely).

On the opposite side we install the second leg - a beam, similarly connecting its joints with the parts of the windowsill with nails.


To strengthen the connection of the parts of the table, we turn the resulting design and hammer the nails in a straight line, fixing the joint of the legs - timber and base - windowsill.

The base of the table is ready.

Second stage: make a countertop.
We saw off two thick boards (genital), connect them to the top of the legs - bars. Nail 120 mm long, use 4 pieces.

To the unclosed sides of the legs - bars we fasten two thick boards. The length of the boards is equal to the length of the countertops (in this master class it is one meter). Fasten with nails 120 mm long, use 4 pieces.


For the front side of the countertop we use a smooth edged board.

We saw 5 segments 90 centimeters long.


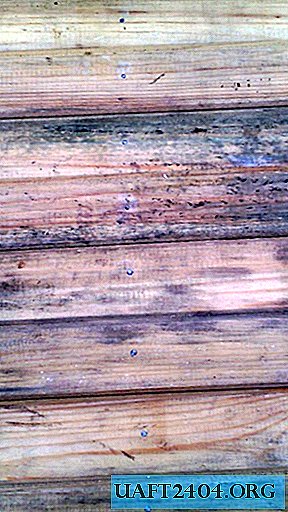
We put the cutting of the edged board on top of the nailed meter pieces of a thick board (placing them across).

Nails with a length of 40 millimeters are beaten by cutting a cut board to two meter pieces of a thick board (hammering nails on both sides). We use 10 nails on each side of the countertop (20 pieces total: 2 nails in each plank on each side).
We cut off the protruding corner of the thick transverse boards (to which the front of the countertop is attached) under the countertop.

This is such a nice little table.

Stage three: working on the design.
So that the table would please us even in rainy weather, we paint it with paints of different colors.

So the wonderful table is ready. He will not be blown away by a gust of strong wind, he will not collapse on his side if you put a five-liter pot with a barbecue on the very edge, and the legs do not crack under the weight of the guests dancing on it. Have a nice meal!

Share
Pin
Tweet
Send
Share
Send