Share
Pin
Tweet
Send
Share
Send
If the compressor is equipped with a receiver, then its operation mode will be facilitated. After all, such a capacity creates a reserve of compressed air, which allows you to take breaks in the compressor.
In this case, the quality of the supplied air will increase, since the receiver equalizes the pressure, smoothes out the pulsations, cools the compressed air coming from the compressor, and collects condensate.
Essential Accessories
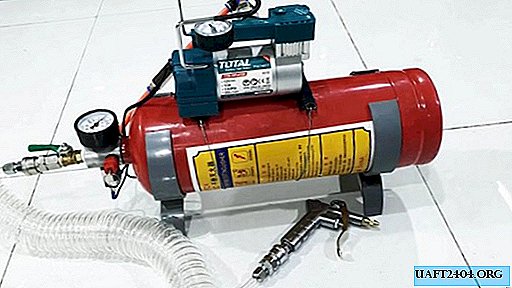
Our installation will consist of two main parts: a compressor and a receiver - a fire extinguisher body. For safe and reliable operation of the device, it is important that the pressure generated by the compressor (140 psi ≈ 10 bar ≈ 10 kg / sq. Cm) is not greater than the pressure that the fire extinguisher body is designed for (20 bar ≈ 20 kg / sq. Cm).


To create an installation operating in automatic mode, we need the following accessories:
- locking unit on the receiver with a threaded channel system;
- safety valve;
- manometer with scale in bars;
- pressure switch;
- valve in the form of a ball valve;
- spiral and linear hoses;
- air gun;
- 12 volt battery;
- fittings, fittings and adapters.
To assemble individual nodes into a single whole we will need:
- wrenches and pliers;
- drill and crimper (crimping tool)
- hacksaw and scissors;
- O-rings and FUM tape;
- knitting wire and double-sided tape;
- piece of plastic pipe.
Making a receiver from a fire extinguisher case for a 12 V compressor

Under the receiver, it is better to choose a fire extinguisher with a large volume. In this case, its effectiveness when paired with a compressor will be higher.
Next, we unscrew the shut-off valve with a hose, shake out its contents from the body (usually this substance is based on ammonium phosphates, as the cheapest, but there may be other compounds).


Then we rinse the inside of the fire extinguisher body with clean water several times. We wipe the container from the outside with a clean rag and dry the internal volume with a hair dryer.

Receiver Options
Before this stage of work, we once again compare the characteristics of the compressor and the former extinguisher body, and make sure that our receiver will correspond to the compressor capabilities in all respects.

We turn a locking unit with a central channel and four side drilling with a thread into the neck of the metal container.


Screw the safety valve into one of the side channels, adjusting it to a lower opening pressure.


Of the two pressure gauges available, select the one that is calibrated in units of pressure bar, and also screw it into another side channel on the locking unit.


In the two remaining channels, we screw the adapter and the switch-pressure switch - the main element of the automation system, including the compressor, when the pressure in the receiver becomes less than the working one.


On top of the shut-off unit, we screw in a ball valve for supplying compressed air from the receiver or its overlap.


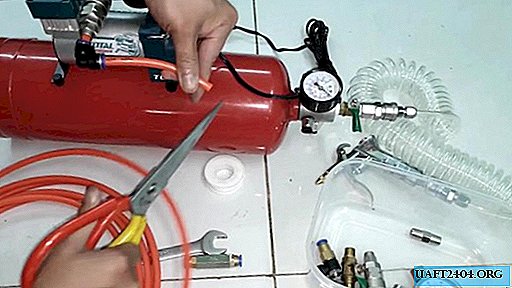
Next, using a set of rubber rings, FUM tape and keys, we seal and strengthen the joints of all elements with the locking assembly and the last one with the case of the future receiver.


It remains to screw onto the ball valve, also using an O-ring and FUM tape, an adapter for installing a spiral hose, on the other end of which an instrument running on compressed air will be attached through the same adapter (we have a pneumatic gun).


Compressor Harness
First we check its performance by connecting to a 12-volt battery, and make sure that everything is in order with it.
We put a hose adapter on the compressor outlet. We seal it with the FUM tape and tighten the hexagonal connector firmly with the keys.


We install the compressor on the receiver to the place where it will be fixed later. We cut off the hose at the outlet with scissors, leaving a small process on which we put on a plastic rectangular fitting. It is necessary to give the desired direction to the hose that will come out of it, and connect to the adapter on the receiver. Between the last two parts, a hexagonal connector crashes into the hose - it is also a check valve.


Installing the compressor on the receiver
Glue strips of double-sided tape on the supporting surfaces of the compressor base. This will allow you to pre-fix the nodes relative to each other, and further contribute to the strength of the connection.
Then, using pliers and a knitting wire, which we pass through the holes in the base, screw the compressor firmly to the receiver.
Production of the supporting part of the installation
To do this, you need a piece of plastic pipe comparable in size to the outer diameter of the receiver. Using a hacksaw, cut three rings of equal width from the pipe.

In two rings we make a cross section so that they can be put on the receiver. We cut the third ring into two equal parts. They, in fact, will be the "legs" of our installation.

In two rings in diametrically opposite sections, we drill holes with a drill. We do the same in half rings in their center.
We connect the rings with half rings in pairs by means of screws and a drill, screwing the hardware from the side of the split full ring.
On the inside of the split rings, covering the heads of the screws, glue along the strip of double-sided tape to fix the rings on the bottom of the receiver.

We install the rings on the receiver, unclenching them along the cut. For durability of fixing rings on the surface of the receiver under each end of the ring, starting from the cut and below, also glue on a strip.

Pressure selection in the receiver and relay settings

After connecting the hoses and turning on the compressor, we check the pressure buildup in the receiver by the pressure gauge and the operation of the unit using a pneumatic gun with the power off. We relieve pressure in the receiver using the safety valve by pulling the ring on the stem.


We cut one core of the wire from the compressor and connect its ends to the pressure switch using lugs and a crimper. We turn on the compressor again and make sure that the pressure in the receiver rises.


Using the hexagon, we adjust the maximum pressure in the receiver, which we chose equal to 7 bar. Now, while cleaning the surface of debris using a pneumatic gun, pumping up bicycle tires, etc., the relay will maintain a pressure in the receiver of 7 bar by automatically turning the compressor on and off.


Share
Pin
Tweet
Send
Share
Send