Share
Pin
Tweet
Send
Share
Send
Each tool or material is created for specific purposes. Hammer nails. A drill is needed for drilling holes. A metal vise is needed to secure metal workpieces. But what if things are not used for their intended purpose? Moreover, sometimes this is absolutely necessary. Worth a try.
Idea No. 1. Device for collecting small metal objects
For this we need:
- a magnet from the old speaker;
- washer;
- screw;
- wooden handle;
- plastic bag.

We put a washer on the central hole and with a screw fasten the magnet to the end of the wooden handle. We pack the resulting design in a plastic bag so that the magnet is at the bottom.


If now this means is brought over a pile of garbage that was formed after the manufacture of another craft or repair of a bookshelf, then all metal objects found in it - screws, screws, washers, nuts, paper clips, small nails, buttons, etc. will stick to the magnet .


Now it remains only to turn the bag in the opposite direction and all the collected trifle of metal will be in it.

Idea No. 2. How to fix a vice and process “delicate” blanks on them

Sometimes it is urgent to take a vice, but which is not fixed to anything. You can get out of this uncomfortable situation with two ordinary clamps. With their help, the vise can be temporarily fixed by installing the upper support of the clamps in the area where the standard fastening is located, to the countertop or workbench with sufficient strength.

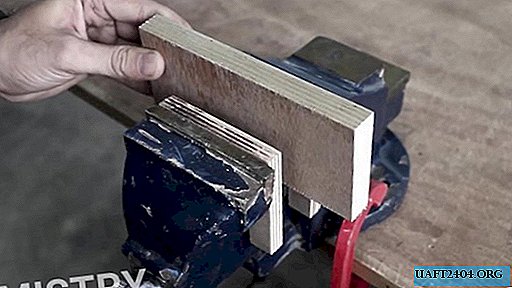
The same vice can be used for clamping before processing workpieces made of wood, multilayer plywood, plastic, soft non-ferrous metals or alloys. To do this, it is enough to make two identical templates from multilayer plywood with a slot for landing on the central beam of a vice. Moreover, the upper edge of the templates should be flush with the jaws of the clamping tool.


Before fixing the soft workpiece between it and the jaws, we place the templates so as not to damage it from touching and pressing hard metal plates of the jaws, which usually still have a notch.
After that, the delicate workpiece can be easily processed without fear of damage in a vice.
Idea number 3. How to protect the vacuum cleaner from debris

To do this, remove the lid with the suction device and the filter, and put in a dust bag a suitable size plastic bag so that it is possible to wrap its edges on the dust collector body.


Yes, it is necessary to make a hole in the bag in advance so that it falls after it is placed opposite the inlet of the dust collector. For reliability, its edges are attached using tape to the wall of the body of the container for garbage collection.

Now it remains to put in place the filter, cover and turn on the vacuum cleaner. All garbage collected after cleaning will be in a plastic bag, and the dust bag will remain pristine.


Idea No. 4. How can tape be used for other purposes for good?
Sometimes it becomes necessary to mix two-component glue, but no suitable dishes were at hand. Yes, even if it was, then after use, I would have to clean it for a long time and wash off the remnants of glue.
In this case, the construction tape is the best. Glue several strips on the countertop or workbench with overlap.

We squeeze the first component on them from the tube, and then the second. Mix them thoroughly with a flat stick until completely mixed and cooked. We use the resulting adhesive mixture for the intended purpose.


It remains only to carefully remove the strips of adhesive tape with the remains of glue from the countertop with one cloth and throw it into the trash. A countertop without a single blot and no dishes is needed, so there is nothing to wash.

Idea No. 5. Homemade hole milling cutter
For its manufacture, we need a wooden cylinder with a through hole along the axis of rotation, a strip of sandpaper, equal in width to the height of the cylinder, and in length - its generatrix, bolt and nut.
Lubricate the back of the sandpaper with a suitable glue.

Wrap the adhesive surface around the cylinder. Press the paper firmly with the help of several rubber rings to its surface.

After the glue has dried, remove the gum. We insert a bolt into the cylinder, onto which on the opposite side of the cylinder we tightly screw the nut. We clamp the end of the bolt in the drill chuck and you can process holes, as well as flat and curly surfaces.

Share
Pin
Tweet
Send
Share
Send