Share
Pin
Tweet
Send
Share
Send
Will need
To make a magnet you will need materials:
- Plastic mold from Kinder surprise.
- Gypsum.
- White and gold acrylic paints.
- Napkins for decoupage with the motifs of the "rose".
- Brush.
- PVA glue.
- Putty.
- Syringe.
- Lacquer.
- Magnets.
We make Easter magnets from plaster

The process of making Easter magnets:
1. The first step is to prepare gypsum and water. We mix the components so that we get a liquid gypsum mass.


2. Next, we prepare the forms for the magnets. At the same time, we will produce 2 types of magnets, since we have 2 halves from Kinder. For the convenience of the form, install in the egg tray. Then fill the plaster in the mold.


3. Gypsum freezes quickly. But, you need to make sure it is completely dry by clicking on an arbitrary area with a sharp object. If there is no trace, then the gypsum is frozen.

4. Carefully remove the molds from gypsum workpieces. The front side of the workpieces is smooth, and the reverse side with some errors. This is not scary, since the back side of the product will not be visible in the future.

5. Priming both sides of the blanks with white acrylic paint.

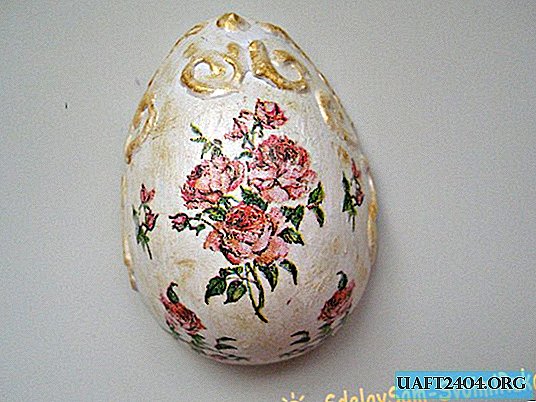
6. Decorate the magnets using decoupage technique. To do this, prepare motifs from napkins. Cut out the elements you like and separate the 2 lower layers of the napkin, leaving only the upper layer with the pattern. For the first magnet we will apply a motif with one big rose. For the second magnet - with many small roses.


7. We take the first blank and apply an element with a large rose to the center. Glue the rose with PVA glue. Leave the workpiece to dry.


8. On the second blank we glue roses of different sizes.

9. The glue dries quickly and the workpieces are ready for further work.

10. Next, we perform volumetric decor. For this we will use putty and a syringe. The first magnet is decorated with putty along the edge in the form of a continuous curving line.


11. On the second magnet, we execute arbitrary patterns along the edge and in the upper part of the egg.


12. Next, we take the golden paint and carefully pass through the voluminous parts of the eggs, as well as a little gold in the central part of each piece.

13. After varnish is coated on both sides.


14. Finally, glue the magnets. Magnets for Easter ready!


Share
Pin
Tweet
Send
Share
Send