Share
Pin
Tweet
Send
Share
Send
The ceiling will be repaired in a standard oblong room of 20 square meters. m. Since the construction of the house, no repairs, except for the usual whitewashing of lime, on the surface of the ceiling has been carried out. Those who first decided on the independent production of drywall construction, experts are not advised to start with complex shapes. Therefore, let us dwell on the construction of a simple single-level plasterboard ceiling. In order to make it more convenient to do repair work in the evening, it is not recommended to remove the light fixture from the ceiling - in our case, a chandelier, as long as it is possible.
Before starting repair work, you must make sure that the apartment has all the necessary construction equipment and materials, namely:
1. punch;
2. a screwdriver (drill);
3. construction knife;
4. scissors for metal;
5. spatula;
6. long level;
7. laser level;
8. roulette;
9. sheets of drywall;
10. straight suspensions;
11. metal profiles;
12. single-level profile connectors;
13. screws;
14. auxiliary materials (primer, putty, serpentine tape and fine-grained sandpaper).
Step one - markup.
Keep in mind that this stage is very important, because the quality of the finished ceiling will depend on the correctness and accuracy of the lines. It is necessary to treat this work very responsibly.
Using a laser level, we outline a line for the initial profile at a distance of 10-20 cm from the ceiling. The height of the markup, of course, depends on the height of the room to be repaired. In addition, the need to hide communications or wiring behind the ceiling structure is taken into account. It should be remembered that the inter-ceiling space should not be less than 5 cm.
With a pencil, draw a line on the wall around the perimeter of the room. We mark on the ceiling for the subsequent installation of direct suspensions. To determine the exact distance, the size of the drywall sheet must be taken into account. Sheets of material will be laid along the room, therefore, profiles should be installed in the same direction, given the width of the drywall. The easiest way will be to lay the profiles, retreating 60 cm. Take a ruler with a pencil and draw a line along the marks.
The second step is to install the frame.
We fasten the initial profile along the marking with dowels at a distance of 40-60 cm. For this, it is necessary to drill holes in the metal profile through a predetermined distance. Then, applying it to the wall, use the punch to make fixing holes in the right places and fix the profile with dowels and screws. If the room is large enough, and one profile is not enough, you will have to increase one more using a special fastener.
We install direct suspensions on the self-tapping screws. This process is quite simple: the suspensions are attached to the ceiling directly according to the marking at a distance of 40-50 cm. After that, the rails are hung to them, which must be fixed with self-tapping screws.
At a distance of 50-60 cm perpendicular to the longitudinal lines, we establish transverse guides. The joints are strengthened with the help of "crabs".
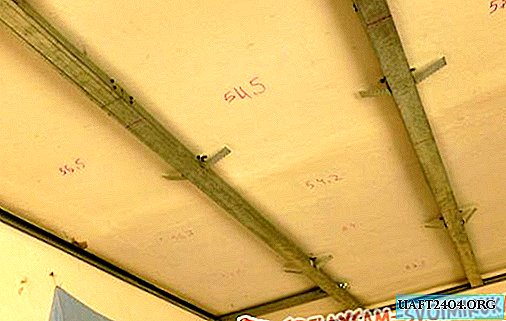

If there is a need to give the structure additional strength, you can fix the profiles by installing additional suspensions in those places where it is necessary. We continue to work until the design takes the following form.

Step Three - Fastening Drywall Sheets.
Before the implementation of this stage of work, it is necessary to conduct electrical wiring, all necessary communications and ventilation. Holes for connecting lighting fixtures can be cut before installation or left until the completion of the process.
The installation of panels is most conveniently carried out by three: while two workers hold the sheet, the third is engaged in screwing it. Special braces are recommended. It is most convenient to fasten drywall panels with a screwdriver and self-tapping screws.
Due to the unevenness of the walls and corners, difficulties may arise during the fastening of drywall sheets. It is recommended to pre-align the joints with the wall or corner - while the sheet will lie more evenly. For better waterproofing, you should pre-treat it with a special primer. Sheets need to be staggered, backing away from the wall by 2 mm. This free space is necessary so that the material "breathes" and does not deform when the temperature drops.
It should be noted that the distance from the edge of the sheet to the mounting hole should be about 1.5-2.0 cm. Between the screws, a distance of 10-15 cm must be observed. The fastener must enter the drywall sheet so that its head is recessed to a depth of 0 5 mm.

Fourth step - repairing the seams.
After fixing all the sheets, ground them. The unevenness between the sheets must be sealed with a serpentine tape and putty. To fill the joints on a drywall construction, a starting putty is quite suitable, which quickly dries up. After that, irregularities are primed again.

Step Five - Finishing Putty.
First, putty of the screw heads should be repaired. It is recommended to use a narrow spatula (7 cm), thanks to which all cracks and irregularities formed during operation will be repaired. Having completed this process, we carry out finishing puttying. This will require a wide spatula. The solution is applied over the entire area of drywall. The putty layer should not exceed 2 mm.
Having finished work, the surface of the ceiling should be treated with an emery mesh. To fix it, you can use special devices. It is possible that to complete the finish may require another layer of putty. Its final drying takes place no earlier than in a day. After this, the surface of the ceiling should again be treated with sandpaper.


As you can see, there is nothing supernatural in the process of creating a plasterboard ceiling. This work is within the power of any apartment owner who wants to save on repairs and is not afraid to learn something new. And the emergence of advanced technologies and modern finishing materials allows us to simplify the process and improve the quality of decoration. Make up your mind, study, try. And you will surely succeed!
Share
Pin
Tweet
Send
Share
Send