Share
Pin
Tweet
Send
Share
Send
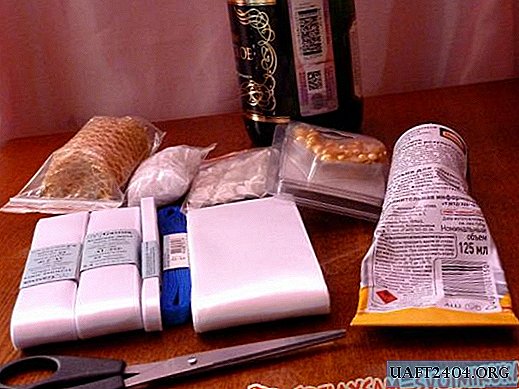
So, for the bride I needed the following materials:
Satin ribbons with a width of 5, 2.5 and 0.6 cm in white and blue;
champagne bottle;
-glue universal "moment";
-scissors;
-lighter;
-thin lace;
-decorative mesh;
-decorative heart-shaped half beads;
-decorative flowers.
First of all, cut off the strip of the widest ribbon.

Its length should be approximately equal to three revolutions around the neck of the bottle. Then, without making an explicit bend on it, fold it in half and stitch the edges with a continuous thread.

Having pulled the thread a little, we make a collar that will fit snugly to the neck in the right place, and glue it with the seam down.


In order to securely hide the seam, measure out a piece of tape of medium width that will hide all this.

On top of it we glue another similar segment so that all the dark places are hidden.

Thus, we measure and stick the tape until the bottle stops expanding.

That part of the future bride, which is even, just wrap it with tape and fix it with glue.

We begin to decorate the dress. To do this, I decided to use a decorative mesh "gold" and thin lace. We measure two segments equal to the circumference of the bottle.

I decided to stick them in such a way as to form the waist of the bride.


Now we decorate the upper part of the dress by gluing beads in the form of buttons.

Kanzashi petals and a thin blue ribbon were glued to the middle part of the dress, emphasizing the waistline. I glued flowers to the junction of the petals and that's what happened.

Getting to the hat. I needed cardboard for this. draw two circles of different sizes and stripes.

Next, we make such incisions.

The left circle will be the hat margins, and the right one will be the top. For convenience, on the top of the future hat, cut off the blades through one.

On the lower part, we carefully bend the blades up.

We glue a strip of cardboard into the cylinder and glue it with white paper.

Next, abundantly lubricate the top blades with glue and stick them inside the central part and glue them from the inside.


Glue the lower part in the same way.

For convenience, I used a suitable size glass.

It is better to start wrapping a hat on ribbons from the top.

I decided to simplify the work and pre-cut segments of the middle tape of the desired length.

They first pasted over the fields above and below, and then wrapped the central part. It turned out pretty well.

Well, now we decorate the hat itself. For this, as a veil, I used the same mesh.

On the top of the hat, I made a pattern using the same kanzashi petals, decorative flowers, and half beads.

Here is a bride I got.

Share
Pin
Tweet
Send
Share
Send