Share
Pin
Tweet
Send
Share
Send
For lace fish you need 2 skeins of Kid mohair ALIZE (62% - mohair, 38% polyamide, 25 g - 250 m), knitting needles No. 5.

A set of loops: for 2 knitting needles, simultaneously dial 309 loops, so that there is a small distance between them. The "patterning" of the edge of the fisu depends on how freely they will be dialed.

The first row, for fastening, we knit with purl loops. It is he who determines which side of our product will be left and which side will be right.


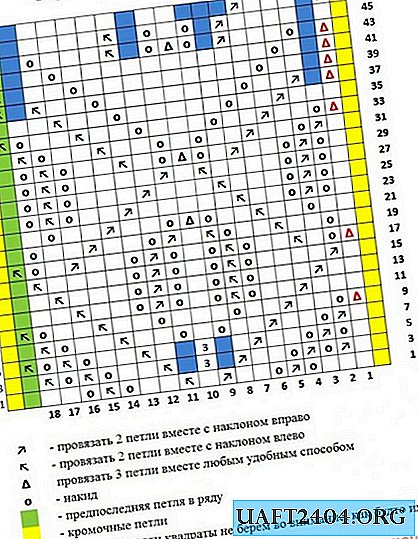
Start knitting each row with 1 edge loop (front) and end with 19 report stitches (see figure) plus edge front loop. Knit strictly according to the pattern, repeating 18 reports in a row. Each report has a total of 18 loops. In the presented figure, for convenience, the edge loops are marked in yellow, an additional loop for the last, eighteenth, report is marked in green and the squares of the loops that are missing are shaded in blue (i.e. during knitting you simply skip them as if you did not see them) .

Having knitted all 48 rows of openwork pattern, we proceed to knitting the shortened rows. They fit as follows:
1) Sew to the middle of the fish, mark this place with a marker for convenience. After doing another 15 loops.
2) Turn the work to the wrong side. Remove the first loop as the wrong one and knit 15 + 15 loops. And again, turn the work to the front side.
3) Knit 29 loops, and knit the 30th together with the loop from the previous row (i.e. 2 loops together). Due to this, “holes” will not appear on the product. Next, we knit 3 more loops and again turn the work.
4) Knit the 4th row like this: 18 p. + 14 p. + 2 p. Together + 3 p. And again we turn the fish on the right side.
5) We knit each subsequent row in the same way as 3, 4 shortened rows, only the number of knitted loops on the knitting needles will increase each time, since in each row we add 3 stitches from rows not yet knitted without a pattern.
When all the shortened rows are connected, knit 43 and 45 rows of the pattern again to decorate the edges. Using the hook, freely close the edge of the fish. It is better to take a hook very thick, if this is not, then you can do it this way: after each closed loop, dial one air loop.


Thread the “ponytails” of loose threads. You should get such a headscarf:

Wash the chip very carefully in a solution of water and shampoos. Squeeze the shawl through the towel, twisting them into a “roll” and gently pressing it. After shaping the fish, stretching the carved edges, fix them with needles on the surface - block the scarf until it dries completely.

And all your openwork, thin and very warm cape is ready.


Share
Pin
Tweet
Send
Share
Send