Share
Pin
Tweet
Send
Share
Send
Sometimes in everyday life, with a home master, there is a temporary or even a one-time need for a particular tool. In this case, buying them is not economically feasible. And after use, they can wallow here and there, causing irritation and a desire to throw them in a landfill.
Below we consider how to make some devices with your own hands from improvised materials without possessing deep theoretical knowledge and versatile practical skills.
Delicate linings on the lips of a bench vise
When clamping workpieces made of wood or other soft materials in a vice, there is always a risk of damage. To avoid defects, it is necessary to make wooden overlays on metal sponges.
To do this, cut out two bars of approximately the same size as the jaws of a vice. In the center of the wide side of the pads, we drill blind holes in depth and diameter corresponding to round neodymium tablet magnets.


Pour hot glue into the recesses, insert the magnets and tightly drive them to the end with a wooden block and a hammer. Spread the vise and put the pads on the lips with the magnet side.


Now we clamp the parts from any soft materials in a vice, without fear of spoiling them, and calmly process them: cut, grind, drill, etc. When the need for overlays disappears, they are easy to remove, connect to each other and save until the next time.

Screwdriver
In everyday life it is convenient to use a screwdriver consisting of a handle, a rod and a set of nozzles or bits. If only nozzles were at hand, then due to the small size it is impossible to use them: it is difficult to grab with fingers and, moreover, create the necessary effort.
In this case, a set of bolts, nuts and two flat enlarged washers is suitable as a handle for the bits. To do this, place two bits of the same size between the washers mounted on the bolt and tighten the nut firmly on top.


Two options for the location of the nozzles are possible: parallel to each other and symmetrically with respect to the bolt or along the diametrical line of the bolted connection. In both cases, the working parts of the bits are sent in opposite directions.


Door handle tool handle

The universal door hinge is not difficult to turn into a tool handle. To do this, pull out the steel bar and replace it with an appropriate diameter and longer bolt with a thread on the end.


We wind a wooden handle with an aluminum cap on the threaded part of the bolt to prevent cracking during tightening. We insert screws into the outer holes of the plates and screw on the opposite side of the wing nut.


Clamping the desired tool between the wings of the loops (hacksaw blade, file, several layers of sandpaper, etc.), you can cut, process the ends, make recesses, grind with comfort and sufficient safety, etc.


We clamp the sandpaper.

Electrode holder

After the tool is worn or broken, plastic handles remain, from which you can make a convenient and reliable handle-holder for electrodes. We clamp it in a vise and drill a hole in the center of the front end until the drill exits into the hollow space.

We wrap the stranded wire of the power cable around the bolt, tighten it with a nut and push the assembly through the cavity inside the handle until it comes out of the drilled hole.
Screw on the bolt and tighten the nut. Then we wind the extended nut, having previously drilled a side hole in it.


From the free end of the elongated hardware we screw a small bolt.

We insert an electrode into the side hole, tighten the bolt at the end of the elongated nut, and the home-made handle holder is ready for welding.

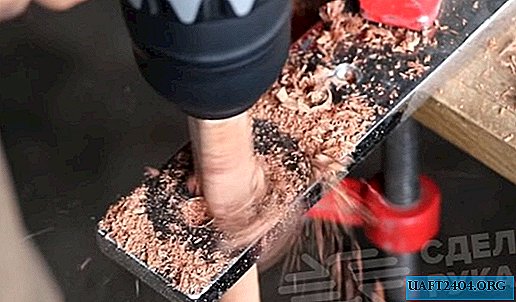
Grinding tool
If there is no grinder, it can be replaced by a home-made grinding device. To do this, cut off two pairs of wooden bars and process them on all sides with a grinder. Folding in pairs, mark the centers of two holes on the upper bars along the edges and drill through them through both bars.

A nail is driven into one of each pair of bars in the center so that it extends 15-20 mm from the other side. Then we tighten the bars in pairs with bolts, placing enlarged washers under the heads and nuts.

Cut the necessary length from the sandpaper tape and insert the ends between the bars, loosening the nuts on the bolts in advance, after which they should be tightened again.


We place the assembled structure instead of a hacksaw blade on the saw body for metal with nails and pull the sandpaper tape.

Homemade grinding device is ready for work with wood and metal.


Drill chuck holder for electrodes
To do this, we screw two nuts on the bolt and, holding it perpendicular to the chuck, weld them to the back of the drill chuck. We unscrew the bolt, wrap it around the stranded wire of the power cable and tighten it with the nut.
We insert a bolt with a fixed wire through a hollow plastic handle with a hole pre-drilled in front, until the bolt passes through it and comes out.

We fix the bolt on the handle with a nut and screw two nuts welded to the drill chuck at the end of the bolt. We insert the electrode into the cartridge and fix it by rotating the cartridge case. Homemade ready for welding.


Wire stripper
A tool for this purpose, a stripper, may not always be available. But it is not difficult to do it yourself from improvised materials. To do this, take two plastic tubes and tightly wrap them with adhesive tape in several layers.


We clamp the tubes in a vice and drill holes in the junction of the tubes, for example, from left to right, sequentially increasing the diameter of the drill. Then we cut the tape and select one of the tubes for further processing.
We again clamp it in a vice and, using the traces left from the first drilling cycle, form a complete profile of the slots, which, as the diameter of the drill increases, will be longer, wider and deeper.
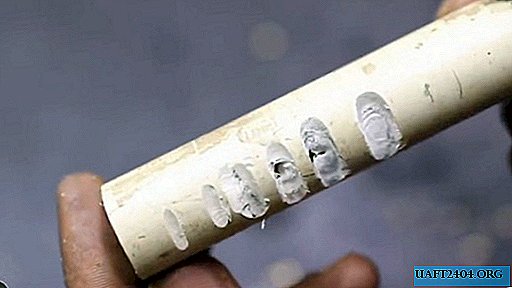


We insert into the tube from the end an interchangeable blade of a carpet knife suitable for length and height with a blade in the direction of the slots and the home-made stripper is ready to work.

To use it, it is enough, depending on the diameter of the wire, to select the corresponding recess on the tube and, slightly pressing the wire from above with your finger, scroll it one turn and pull it towards you. In your hand you will have a wire with a bare core, and on the stripper - part of the insulation.


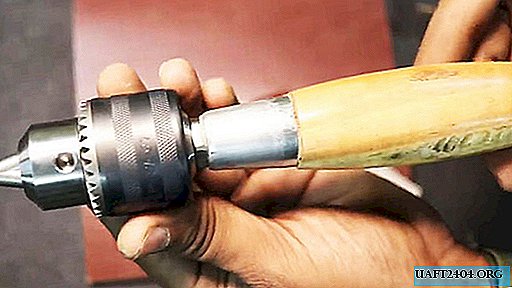
Tool holder

For this version of the universal grip, we need a drill chuck and an extension (adapter) with a nut and thread on the end that is screwed into the chuck body.

To improve the operational capabilities of the device, we turn the cartridge to the limit and place a screw with a round conical head inward from the working side and screw it into the drill.

Then we take the finished handle made of wood with metal reinforcement at the ends. We try on the extension of the cartridge and to increase the reliability we put it on two-component glue in the hole of the handle.


After some time necessary for the glue to harden, the handle is ready for use. Holding the cartridge, and rotating the handle to the right, we fix the tool, to the left - we release. It can be a file, a bit, a key, etc.


Universal wrench.


Share
Pin
Tweet
Send
Share
Send