Share
Pin
Tweet
Send
Share
Send
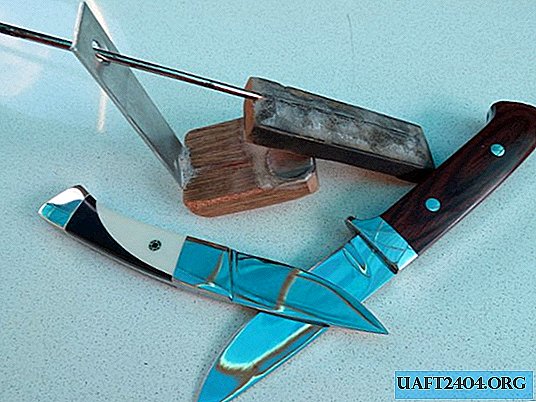
Of course, you can buy a finished product in a store by spending a certain amount. For those who do not have extra money, and have a desire to work with their hands, I suggest making a knife sharpener yourself. We use junk materials for this, which cost almost nothing, while the device will work no worse than the factory one.
Any interest? Then let's go.
Necessary materials and equipment
We will need:
- a bar of sandstone, grindstone or something like that, I personally recommend sandstone;
- a sufficiently strong magnet (and preferably two) of a flat shape. You can disassemble a speaker that has expired, and if an unused neodymium magnet turns up, it's super;
- device for measuring angles. An ordinary school square with a ready-made required angle (in my case 30 °) is suitable here;
- thin metal rod (I used copper);
- a few pieces of thin board;
- rectangular bracket, which are usually used to fasten shelves to walls;
- cyanoacrylate, commonly known as super glue;
- baking soda;
- and you won’t believe it - a knife)).

Of the tools you will need a grinding machine (grinder), a file and a saw.
Security measures
I proceed from the assumption that a person who sometimes works with his hands is well aware of the potential dangers that arise in cases:
- work with electric tools;
- the use of sharp cutting objects;
- the course of certain chemical reactions.
Getting to work
Attach a magnet (or two magnets, like mine) to a wooden block. To do this, pour a thin layer of soda on the bar, wet it with drops of super glue and glue the magnet.

We make or get a finished block of sandstone. I cut out a few rectangular bars (in reserve) from sandstone. Used for this grinder and a special disk for cutting granite. The surface of the bar was leveled by a grinding machine. It took literally minutes. Immediately recommend making a few bars.

With a grinder, I additionally aligned the back, non-working side of the bar, to which the rod will be glued. I also sharpened the rod itself to increase the area of contact with the bar.

Further, according to the technology you already know, using soda and super glue, I connect the rod to the bar. I polished the resulting monolith from soda and glue, giving it a more attractive (as it seemed to me) shape.

Sharpening angle
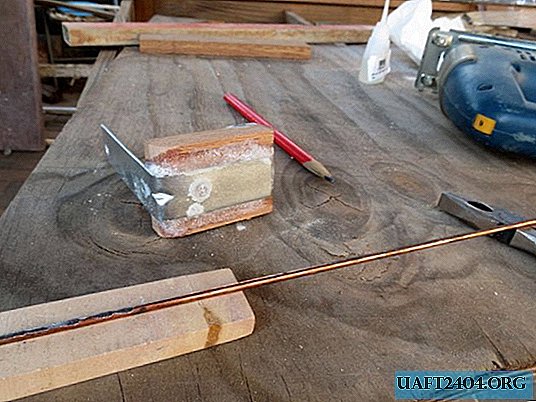
Now you need to determine the cut line of the wooden block, on which magnets are glued. This must be done in such a way as to ensure the fixation of the grindstone at an angle of 30 degrees to the plane of the knife blade. Why exactly 30 degrees? I can’t explain, I just decided so, and you can choose your angle.

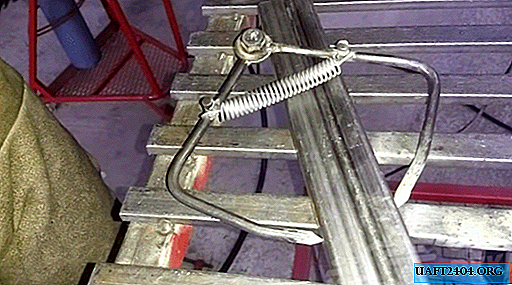
We place the bar with magnets on a flat surface, placing our rectangular bracket under it. We install a template triangle on the magnets with a long leg. We lean an emery stone against the edge of the bar and orient it so that the rod coincides with the hypotenuse of the template (or is parallel to it). This will be the required 30 degrees to the plane of the magnets, since the smallest of the corners of our template triangle has exactly this value. Now you need to move the bracket along the bar until the position of the rod coincides with the hole in the bracket into which it will be inserted. In this position, mark with a pencil the cut line of the bar.
Putting the foundation of our device
There is especially nothing to say here. Look at the photo of what should happen. Yes, all the same, soda + super glue is power!


Checking and adjusting the grinding angle
After completing a test sharpening of a blade, make sure that the angle suits you. You can drill several holes in the bracket corresponding to different angles.

Testing
When sharpening, I often recommend dipping the grindstone in water.

Using a knife is not at all difficult. Magnets reliably fix the knife in the required position, it is enough just to hold it slightly with one hand.

What else can be done?
Having formed the sharpening angles on my blade from scratch, I was convinced that the wear of the grindstone is negligible. In any case, I made several whetstones in reserve and if necessary I will change them.
In general, I am satisfied with the operation of the device. Another thought came to my mind - to make a grinding whetstone from ceramics for finishing processing of sharpened edges. I'll try to implement it. Good luck to all!
Original article in English
Share
Pin
Tweet
Send
Share
Send