Share
Pin
Tweet
Send
Share
Send
Any knife with a fixed blade, designed for operation outside the house, without a sheath, loses a significant part of its functionality. It is inconvenient to remove it from the backpack, and in the pocket of your clothes it generally becomes traumatic. If the knife with which you are going fishing, hunting, mushrooming or camping does not have “clothes”, you can make it yourself.
My task is to sew a sheath for a fultang without a specialized tool and from available materials. The length of the knife is 250 mm, and the thickness in the butt is 4 mm.

Materials
- Leather. 3.5 mm thick vegetable tanning scraps - trimmings from an old tool case. Scabbard made of such leather does not require additional stiffeners.
- Thread. Waxed shoe thread was bought at a haberdashery store.
- Wax. They will process the ends of the skin. I use carnauba (palm) wax - the most refractory and non-greasy to the touch. It is sold as cereal in cosmetic stores. Alternatively, technical paraffin (candle) or beeswax will do.
- Holster screw. He will play the role of a fastener. Instead of a screw, a spare button from a jacket or a raincoat is suitable.
Instruments - Shoe knife.
- Caliper with carbide inserts for marking. Instead, you can use the usual drawing compass or meter.
- Ball pen.
- Contact adhesive.
- Two gypsy needles.
- Pliers.
- Drills with a diameter of 1.5 - 2, 4 and 5 mm.
- Bench drill machine.
- Belt Sander.
- Fabric circle.
Marking and cutting parts
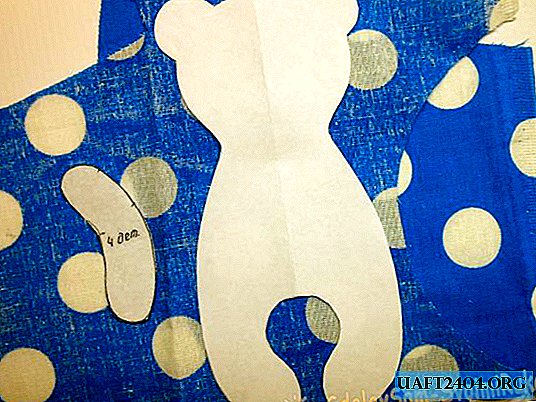
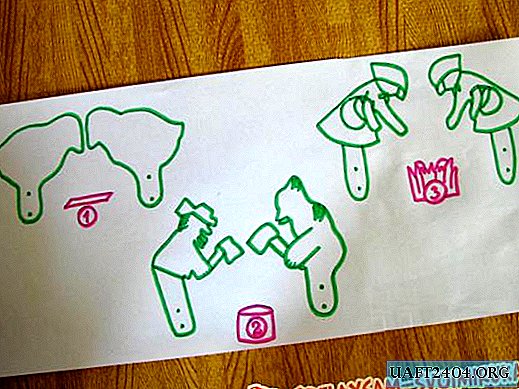
By design, the product will resemble the sheath for the Finnish NKVD. We put a piece of cheprak bakhtarma up, and on it - a knife. This will be the front of the scabbard.

Carefully circle the outline with a ballpoint pen. Mark the line where the handle starts, and align the “dip” on the side of the butt. Set aside 10 mm on the vernier caliper and draw two lines using the drawn outline as a copier. We evaluate the result, circle the pen and, if necessary, adjust the shape manually.

Pay attention to the position of the knife! I make a scabbard under my right hand, and if you are left-handed, turn the blade on the other side, i.e., mirror.
We trim the outer contour with a boot knife. Particular attention should be paid to the line of the mouth, so that the handle adjoins to it without a gap. Then we make the same detail - a spacer, but in it we cut through the internal lines. It will form the inner cavity of the scabbard and protect the seam from undercutting. When applying parts, the “tails” of the spacer should protrude from the mouth. They are trimmed after gluing.

The shoe knife should be well sharpened! Cut each line with minimal pressure in several passes. On curved sections, work only with the tip. Lay the skin on a wooden base.
Bonding and contouring
We assemble the front part with a spacer on the glue. We control the width of the cavity with a blade.

The next detail is the wrong one. We mark it so that the bakhtarma is in the cavity of the scabbard. The side of the blade follows the shape of the two previous parts. The part on which the handle rests is randomly marked. The main thing is that the back does not protrude beyond the sheath. Then there is enough space on the strap that will fix the knife, and on the suspension.

Glue the wrong side.

Cheprak is a thick and hard material that is almost impossible to cut without errors. After gluing, the ends of the sheath will be uneven.

We process the contours on a grinder with a belt of 60 or 80 grit. Alternatively, you can use a grinder or a grinding machine with a petal wheel. It is better to process the skin on the emery tape, since the stone is clogged by its particles and “burns”. The task is to remove all irregularities from the knife and maintain a right angle between the end and sides of the sheath. After machining the contour, the spacer width is about 7 mm.

Use eye protection and respiratory protection! Due to dust and debris, it is better to do the installation in the workshop or on the street.

Seam marking
We mark the seam on the front side. We set the caliper to a size of 3.5 mm, draw two lines from the tip to the mouth. The inset mounted on the rail rests against the end, and the second, mounted on the rod, is used as a scriber. The line will accurately copy the shape of the scabbard, and its quality depends on how well the end face has been polished.
We set the seam step on the vernier caliper (I have 7 mm). We mark the first point for drilling at the intersection of lines (the sharp tip of the sheath). We install one insert of the caliper in it, the second we mark the next hole. We rearrange the tool one step at a time until we reach the mouth.

To make the markup more distinct and correct possible inaccuracies, it is advisable to walk on it again with an awl. We determine the place where the strap will be located (drawn by a pen).

Drilling holes
Professionals working with leather make holes with a specialized tool - a punch. I used a desktop drilling machine (drill diameter 1.8mm).

The same operation can be done with a hand drill or engraving machine, but you will have to carefully monitor the verticality of the spindle, otherwise in the end the seam from the wrong side will “walk”. While you are near the machine, you can make grooves for the strap and suspension. I drilled holes with a diameter of 5 mm and cut a boot knife between them.

We refuel the strap, insert the knife and outline the fastener. First, we drill the upper hole (under the head, diameter - 5 mm), then through it we outline the bottom (under the screw, 4 mm).

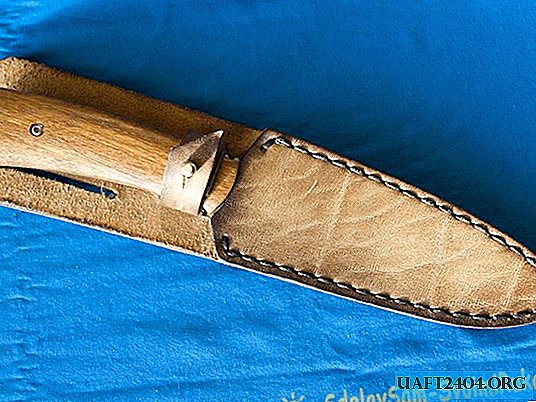
After installing the screw and checking the excess part of the strap is removed. To facilitate the passage of the head through the hole, we make an incision of 3-4 mm in it.
Please note: skin color has changed. After drilling, the sheath blank is processed on a sandblasting machine. After that, I rubbed the ends with carnauba wax and went over the rest of the surfaces. As a result, the edges turned darker. To apply carnauba wax, a fabric wheel mounted on a grinding machine was used. Paraffin can be applied manually directly to the end, and cover the remaining surfaces with shoe polish.

Firmware
I used a saddle seam - simple and reliable. We cut the thread from the spool and thread its ends into two needles. We make two seams: from the side of the butt and the cutting edge of the knife.

To fix the thread, insert it into the eye, pierce it 3 cm from the edge and tighten. So she will not slip when pulling through the hole. With this sheath thickness (about 10 mm), the thread should be 6 times longer than the seam. You should not do less, otherwise it will be inconvenient to work or it may not be enough.
Pass the needle through the hole on the tip of the sheath and align the thread. To facilitate broaching, you can use pliers. The needle located on the front side is inserted into the next hole. We stretch the thread to the end, making sure that it does not twist. We pass the "wrong" needle into the same hole towards. We perform the final tightening.

We start each stitch from the front side. We try not to puncture the thread that is already in the hole with the “oncoming” needle.
At the end, the seam must be fixed. To do this, re-sew the last stitch in the opposite direction, bring the front thread to the wrong side, cut and cauterize.

The firmware itself took 20 minutes, and about 2 hours had to be spent on preparatory work.

Share
Pin
Tweet
Send
Share
Send