Share
Pin
Tweet
Send
Share
Send
The blower made by the author of the video emphasizes that originality can be found in everything, even in cleaning products. And despite the fact that there are already many brush brushes, air spray guns and panicles, someone comes up with such a unique homemade product.
Necessary resources to build a miracle blower
Materials:
- Five tin cans - three flat, two high;
- Motor, type 775;
- Two lithium-polymer or similar batteries with a contact group;
- Button switch with wires;
- Several plastic gears to fit the size of the motor shaft.


Instruments:
- Screwdriver;
- A set of conventional and feather drills;
- Scissors for metal;
- Ordinary scissors;
- Soldering iron with flux and solder;
- Impeller with abrasive and cutting disc for metal;
- Glue gun;
- Adapter for charging batteries.
- Screwdriver, pliers, knife.
Do-it-yourself blower assembly
Stage One - make a housing with a guide tube
To begin with, we take a wide tin can, and make a hole in it with a screwdriver on the side with a pen drill with a diameter of 20-22 mm.


At the bottom of the same can, we make a small hole under the motor shaft. This can be done with a conventional drill or use a turbine (there will be less burrs). Having tried the engine in place, we note two side holes for the mounting bolts for it. The hardware is small, so we make holes under them with a 2.5-3 mm drill.


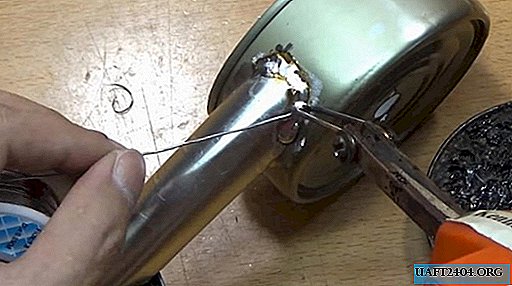
The guide tube is made of a high narrow can. We cut the bottom and collar with scissors for metal. Then we take any round rod, and twist the tube of small thickness, which we give the shape of a cone.


The joint of the two edges of the sheet is cleaned with an amalgam with an abrasive. This must be done for a good connection. To keep the tin in shape, we put a rubber tie on the edge of the tube. We take a soldering iron, and with the help of a flux we solder the entire joint.

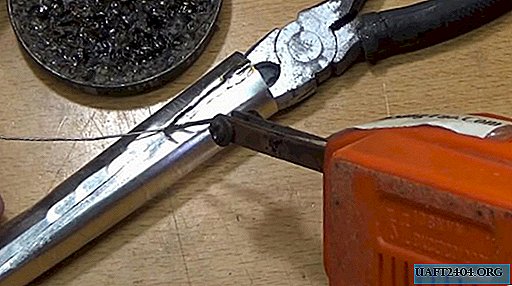


We note the section of the tube at an angle of the circle of the can, like a watering can. We cut the tube gate with scissors.


We attach the base of the tube to the hole in the bank, and solder it with a soldering iron. Solder needs to go through the entire gate so that the connection is reliable. Our case should have the following form (photo).


Stage two - we make the impeller
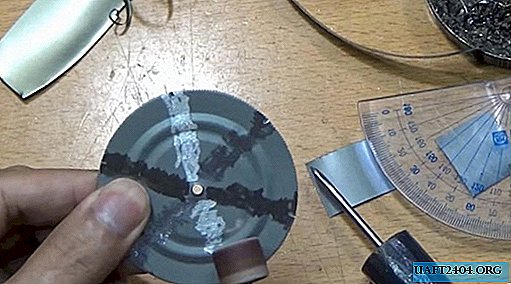
From the next wide, smaller jar, cut out the bottom and side wall. Six small petals are cut from the resulting tape.


The bottom should freely fit into the inside of the case (large cans) without touching its side walls. We make a hole in the center with a drill or awl, and divide the circle into six equal parts. To do this, you can use the protractor, marking 60 and 120 degrees from the center line.


Mark the lines with notches using metal scissors. We clean the marking with an abrasive along the entire length of the solder. We do the same with the petals.


Slightly bending the petals in an arc, expose them one by one, and solder to the lid with a soldering iron. The impeller center should remain intact.


To transmit torque from the engine to the impeller, we use a plastic gear. For her, we expand the hole with a suitable diameter drill. Fix it with epoxy glue.


After drying the epoxy, we collect the main part of the device. We fix the engine to self-tapping screws, and after we fasten the impeller as well.


Stage Three - Outer Cover and Electrics
In the third wide bank, we select the middle in the bottom with a furniture milling cutter. We cut off the excess so that one lid remains, suitable as a cap for the housing.


We bend the edges of the lid slightly with pliers, and insert it into place in the body. We fix the connection of the plug for reliability in several places with a soldering iron.


The electrical circuit of this homemade product is simple. A battery is involved in it, which has two outgoing contacts for supplying electricity to the device (engine), and two incoming contacts for recharging. We solder two wires to the engine with a connector for the contacts of the batteries, and connect these two elements. An intermediate link in the chain is a button. We bring the button-switch to the side surface of the case, and glue it with hot glue. We also fix the batteries.


The device is ready, now charge the batteries through the adapter, and check it in action.


Conclusion
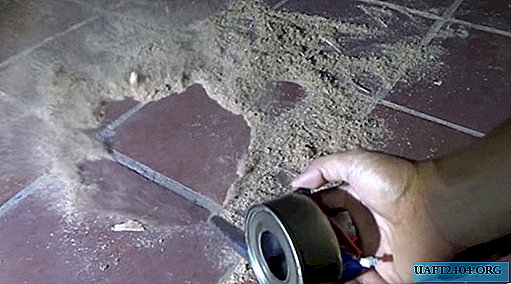
Such an unpretentious little thing is capable of quite powerfully blowing air, sweeping away debris from machines, a desktop or a surface necessary for work. Of course, this is not a complete solution for cleaning the workshop, and sooner or later everything that is unnecessary will have to be swept into the trash. But when it comes to saving time, and the compressor is busy, such a blower will be most welcome. Good luck to everyone and bye!
Watch the video
Share
Pin
Tweet
Send
Share
Send