Share
Pin
Tweet
Send
Share
Send
And for this, the following materials and tools will be required:
- - an iron rim.
- - double-sided thin tape.
- - blue thin ribbon for the rim.
- - scissors.
- - lighter.
- - a soldering iron with a thin tip.
- - a small piece of glass or tile.
- - two circles from a can with a diameter of 4.5 cm.
- - a tape of 5 cm in white, yellow and blue (synthetic fabric is possible).
- - iron ruler.
- - glue gun.
- - cotton ear sticks.
- - green felt.
- - blue stamens for flowers.
- - ordinary black threads.
- - some white paint.
All prepared and get to work. Let's start with the rim. Since the glue does not adhere well to metal, we will use double-sided tape.

On the upper side and along the entire length of the rim we glue a strip of adhesive tape. If it goes beyond the edges, it should be cut strictly to the width of our base. Then you need to attach a thin ribbon on top of the tape. At the very beginning of the rim, glue several turns of tape, going to the upper and lower sides of the base. So that when using the product it does not crush behind the ears. And then we fasten the ribbon only on top of the tape, raising the protective film.

And we finish the rim processing with curls on the second edge of the base.

Now we can move on to the colors. We will make from tapes or synthetic fabric of the desired color. In the composition itself there will be 5 cornflowers and 4 daisies. And for this we cut 16 white squares, and there will be 40 blue ones. All are 4.5 cm in size.

And we will cut out with a heated soldering iron on the prepared surface. We use two tin patterns. One circle should be changed by making denticles around the edge.

According to the pattern, cut the curly blue petals. And on the white circle, additional processing is needed. First we put a dot in the center. Then, using a ruler and a soldering iron, divide the circle first into 4 equal parts, then divide each quarter into 3 petals by two lines. Just do not forget to leave an untouched circle of 1 cm in diameter in the middle of the workpiece. It turns out a daisy with 12 petals. It remains only in each petal to round neatly sharp corners with a lighter.

You can now proceed to the assembly of daisies. Only additionally you need to make blanks for the middle. From a yellow ribbon or fabric, cut out strips 18 cm long and 1 cm high. We make shallow fringe on them. You will also need 4 circles of felt with a diameter of about 2 cm. And for the base of the middle, we will use the cropped half of the ear stick.

Naturally, we begin to glue the middle of the chamomile first. First, we glue the cotton wool with the fringe, and then we place the remaining strip around the sticks on the same level. We glue only the lower edge of the fringe blank.

Then we straighten the middle and glue two petal circles alternately from below, passing them through the outlined center.

And when the glue is well fixed, cut off the stick at the level of the last petals. And on top of the cut we fasten the green circle of felt.

We do all 4 daisies in the same way.

Now go to the cornflowers. For one flower you will need 8 blue petal circles, a blank of felt with a diameter of 2 cm, a spool of thread.

To begin, we will process the cooked circles. The billet is folded in half horizontally, we hold the fold up. Then we fold it in half again, but tilt it to the side. Then we hold the workpiece by the folded middle and fold the resulting two bends again in half. Separately, we lower the angles down, only in different directions, we get a common folded triangle. We fasten the middle with a lighter so that the assembly does not open at all. We make 8 petals.

Now we will mount them on the green circle. First, glue in opposite directions. Top, bottom, opposite sides.

Only 4 blanks were used. And the rest you need to place one by one between the attached first.

We collect all 5 cornflowers, while the center of the flower remains free.

Now we need stamens, which we will make of black threads. On 4 fingers of our hand we wind the threads, about a hundred turns. Then mentally divide the folded threads into 3 parts. And in two places we glue, give time for the glue to set.

Then with scissors we cut each strip of glue in half. Immediately you need to additionally process the sections with glue so that the threads do not pop up. We level the height of the resulting stamens, straighten.

And well we fasten them in the center of each cornflower. We distribute so that there is no empty space.

To complete the flower it remains only to process with white paint, a little to go along the upper edges of the stamens. We give a good dry, because different paints have their drying time.

Well, it's time to collect the whole composition on a prepared basis. In addition, we prepare 8 bunches of ready-made stamens for flowers. Each workpiece has 5 threads folded in half and glued at the bottom.

We will fix these bunches on daisies, placing them from the center on the same line. Only turning in different directions glue on felt.

Now we fasten all the finished flowers to the rim. The first glue cornflower is strictly in the middle of the base. On both sides of it we have a camomile. Stamens are located to the side of the cornflower.

Then we simply follow the order of the blanks and glue, alternating the flowers. Finishing the composition with cornflowers.

Do not forget about the wrong side of the work. We cut another 9 green blanks and with them we close all the places of the connection of colors with the rim. If there is a ribbon with an inscription about manual work, it can also be attached.

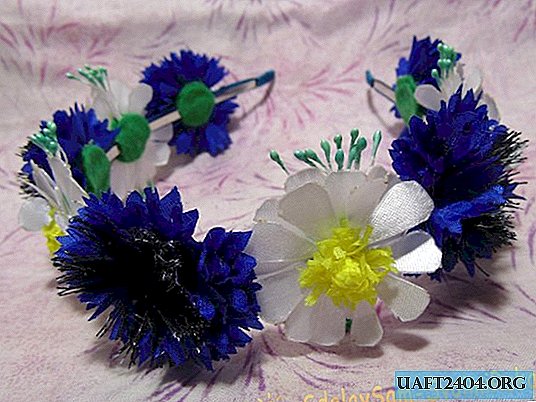
Now the work is completed. A beautiful bezel with wildflowers is ready.

Good luck to all!
Share
Pin
Tweet
Send
Share
Send