Share
Pin
Tweet
Send
Share
Send

Such a bouquet consists of three roses and two buds. And for work we take materials:
- acrylic paints.
- foam rubber in red and green.
- wet wipes.
- scissors.
- a toothpick.
- lighter.
- wire.
- soft thin green paper for creativity.
- Moment glue.
- a plastic print of a sheet.
- a decoration of red beads on a wire.
- iron base for brooches.
- glue gun.
- food foil.
To start manufacturing, draw 4 petal patterns. The shape is like three circles joined together in the center at an equal distance. They have only different sizes in diameter. We will use 9, 8, 7 and 6 cm. And for the sheet we draw a boat of 5 cm and a width of about three cm. But in addition the sheet needs a small leg.

We take a red plastic suede and using templates with a toothpick we outline three parts of two large sizes and one part each of the remaining two blanks. Cut preferably in a circle, leaving the necessary trim in the future.

Now we take black acrylic paint and use a damp cloth to tint the upper edges of the petal circles on both sides.

You also need to tint 9 trimmings, having previously trimmed thin edges.

Further we will give the petals a new shape. We will use a lighter. For each individual petal, slightly warm the painted edges and fold them with an accordion. Then with your fingers we scroll only the upper part of the workpieces and straighten it a little.

And the three largest petal circles additionally warm the middle of the workpiece and, while warm suede with your thumbs, make a deepening. It is necessary to take into account that their direction was from nutria.

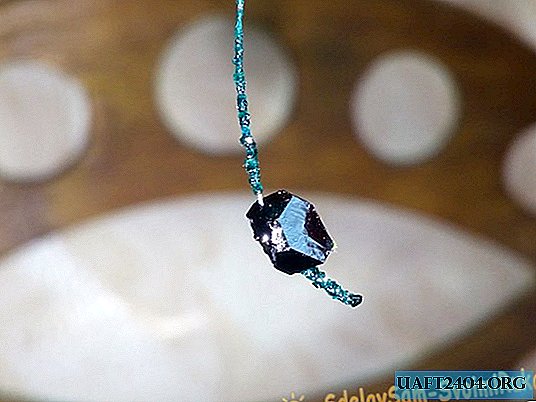
All the parts are ready, we proceed to the assembly, we will start with the buds for which we use blanks with a diameter of 6 and 7 cm. From the foil we add a droplet about 2 cm high, fasten it to a wire 14 cm long.

Then, with a heated gun, glue on the foil base in turn three parts of the petal circle. It will be necessary to close the entire base and not leave space in the upper part, fix tightly.

Buds can be different in the upper folds. It also follows that we wrap a thickening from strips of thin paper under the buds.

Now we turn to the assembly of roses. Take a pair of petal circles of different shapes and 4 colored trim. And the base of the flower will be foil folded in the shape of an egg and fixed on a wire.

We glue the glue gun first on the crown of the future pruning rose, placing them in a spiral, make a closed middle.

Then we pierce the petal circle without bends, raise it up the wire and glue it to the bottom of the foil. We place the petals with the approach of one part to another. We make a closed rosebud.

Then we fix the second workpiece with a volumetric center. Petals should be staggered relative to the first. And we apply glue only to the middle of the petals, so that the rose opens slightly.

And it remains only to bend some corners with a lighter, making curls from the middle.

But in the composition there are three roses, which we do similarly.

Now it remains only to paste over the stems with green paper.

We turn to the green blanks. We cut out 8 suede leaves with a leg and a circle with a diameter of 5 cm.

To shape the veins, we will use a plastic print of a rose leaf. If there is no such device, the veins can be drawn with a toothpick on a sheet. Just warm the workpiece and apply it to the mold, lived all the veins with your fingers.

Then we process the greens, the paint is darker in tone. We use a napkin, we draw it along the leaves on both sides without strong pressure. The veins remain bright. Additionally, we process the cut circle and three squares, 2 cm in size. We do not make the color monotonous.

Now we take semicircles, make cuts along the rounded side, similar to grass. Then we fold the cut edge together and scroll with our fingers, we get a new shape of the workpiece.

And such sepals need to be glued to the buds. They should close the thickenings made under the bud.

And these stubs can only tint the stems a little dark.

Now we process stickers for roses. You need to fold the green squares two times and cut the cloves, then also scroll them with your fingers.

Now fasten them to the bottom of each rose. And the stems of the flowers should be darkened with green paint.
There were blanks of leaves, we will plant them on a wire. In a rose, the leaf consists of three leaves, like a twig. And for this we take a wire of 8 cm and two pieces of six cm.

For convenience, we make a fold in the middle of each leaf. Then with the tip of the wire we make two stitches on the sheet. Starting from the leg and moving to the middle, and then leave the free edge on the front side, which is glued with the “Moment”.

Next, the stem of each leaf is covered with paper. And we collect 3 sheets together, also process, making a common stem.

Then you just need to spread the leaves. And the green details are all ready. It turns out two branches and 2 single leaves.

Add only the tinted stems with dark paint.

Now the most interesting part of the work remains. This is an assembly of the overall composition. Take two buds, 3 roses, leaves.

Additionally, you should take some jewelry. Need a twig of red beads on a wire and three bundles of sticks of shiny suede.

On the buds are long stems that will serve as the basis for the entire composition. Let's get started. Glue the buds on the green decoration. Then we connect the two stems with wire together in the middle of the main segment.

Further along the front side we lay two roses near the buds at different heights. We fasten the same wire.

Now we attach a green ornament to a branch of beads, and we place this bunch between two roses. And on the wrong side we apply two branches of leaves. And all this should be well fixed.

Now this first winding of the wire should be carefully sealed with paper and you need to make tinting with green paint.

And to this place further we will arrange the third rose. It needs to be fixed below the wire.
We still have two single leaves, which we place on the third rose and fasten, and close the junction again with green paper.

The bouquet is assembled. It turned out a lot of stems, we choose a few pieces at our discretion and wind them in spirals.

Now only one detail remains. A special brooch pin will need to be secured on the wrong side. We will use wire and a glue gun.

We apply it in the area of the first twist of wires. We position it with an inclination and thread the wire over the face of the bouquet. We slightly bend the third flower and twist the wire well, cutting off the excess tails. We grease this place with a gun and press the bent rose there. And under the pin itself, it is also good to pour glue.

Now you should fix all the leaves on all sides.

And on this our decoration is completely ready. We give time to dry the paint.


Good luck to all!
Share
Pin
Tweet
Send
Share
Send