Share
Pin
Tweet
Send
Share
Send

First you need to figure out what it is and what functions this dimmer performs. Dimmer is also called a dimmer - this is a device that allows you to smoothly adjust the voltage at the load. It is mainly used to adjust the brightness of halogen and incandescent lamps, but also, it can be used to adjust the temperature of the soldering iron and other devices. The name from English translates as - darken, fade, etc.

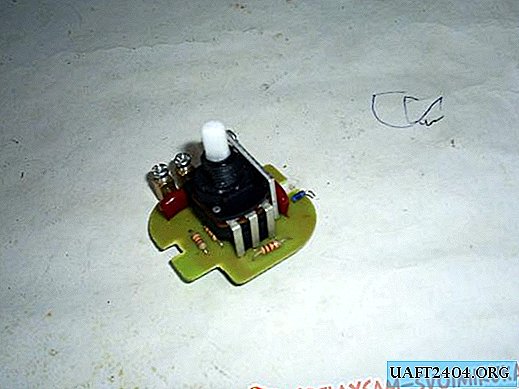
Thanks to the dimmer, energy can be saved, this happens due to a decrease in voltage and current flowing through the regulator, although the lamp brightness will decrease, but sometimes in some rooms it is very handy, and sometimes it is even necessary, for example, in a room for developing photos or in brooders for temperature control etc. A dimmer also helps to extend the life of incandescent lamps by smoothly raising the voltage, because the lamps burn out mostly at the moment of switching on, since before connecting the lamp itself and the tungsten filament are cold, respectively, the resistance of the filament is many times lower and the current strength is higher than with hot . Unfortunately, the dimmer that worked for me for three years without problems, suddenly burned out, and I decided to reanimate it. First, I took it apart. In my case, and mainly in inexpensive dimmers, to do this, pull out the knob, unscrew the nut that is under it, then unscrew the two screws on the back of the dimmer and pull out the board with the parts.
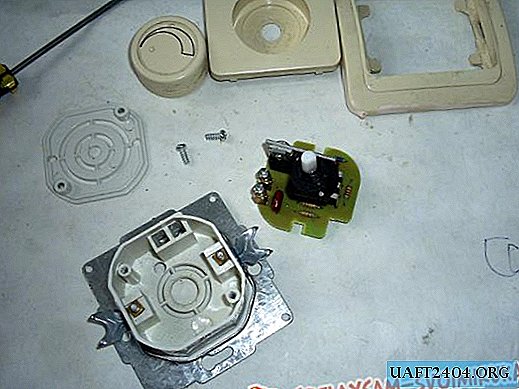
Further it is necessary to visually inspect. Sometimes it happens that the inspection reveals some breakdowns, for example, darkening of resistors, split or rupture of a triac, split of a film capacitor, etc., and sometimes you can see the consequences in the form of a burned-out track on the board.
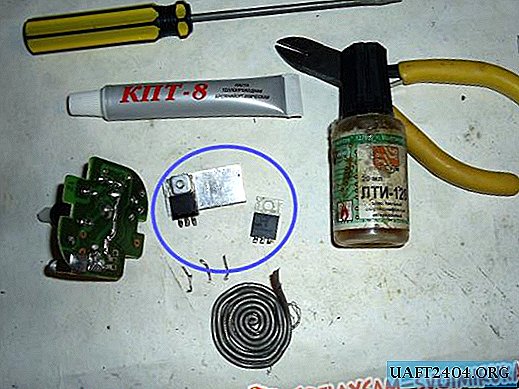
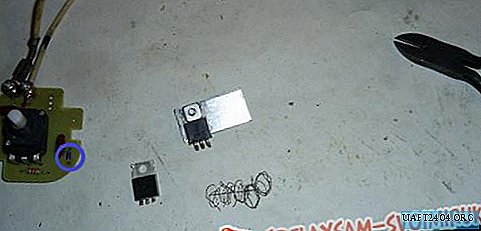
In my case, the inspection did not show any defects, and I took up the multimeter (tester). Usually a triac in these regulators fails, and it actually happened to my dimmer. There is still such a malfunction, at the moment the dimmer is turned on, the bulb flashes briefly, this can also be fixed by replacing the triac, and sometimes the dynistor, this is due to secondary avalanche breakdown of the PN junction, one of the semiconductors. In the photo, two triacs inside the blue circle.
Checked with a multimeter, the triac rang (missed) in all directions, and missed not as a semiconductor, but as a conductor (piece of wire). Having ascertained the malfunction of the triac, he unsoldered it and replaced it with a known worker. Between the triac and the radiator I applied KPT-8 (heat-conducting paste), of course, it would be possible to do without the paste, just the paste fell under (so to speak) hot hands.

In my controller there was a triac with the designation BT 137-600E, it is designed for 600 volts 8 amperes. I replaced it with the BTB 24-600B that was lying around with me, as can be seen from the designation it was designed for 600 volts and 24 amperes, that is, the dimmer became even more powerful. Triacs can be others, but you need to look at the datasheets to fit in power, pinout and control currents.
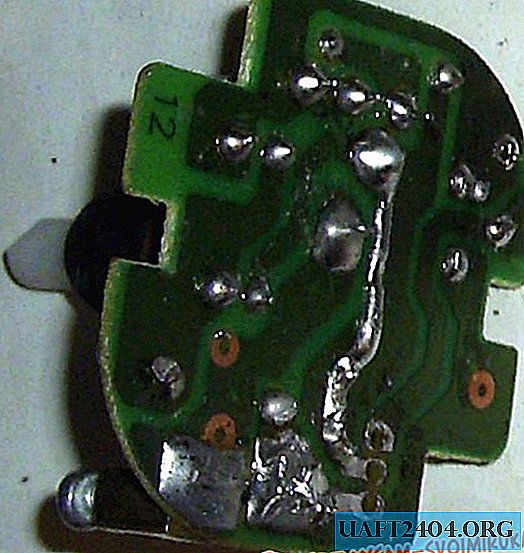
Then he cleaned the holes where the triac will be soldered, half-welded with a solder flux and soldered it to the prepared place. After that, I wiped the board with a cotton moistened with alcohol where there were flux residues.
It burned out with the light bulb in me, and I assumed that the triac was out of order due to the arc that arose when the lamp burned out and provoked a power surge.
I also checked the symmetric dinistor (DB3). It is checked so, first you need to try the tester (in the diode test mode) to ring in both directions, it should not ring. Then screw the resistor 1 Kilo Ohm onto the tester probes, connect the first end of the probe to the dinistor, and connect the microfarad capacitor 100 (charged) between the second end of the dinistor and the tester, the voltage on it is slightly higher than the breakdown voltage of the dinistor. If the tester (in voltmeter mode) shows a falling voltage, this means the dynistor is working. If it is not working, a replacement can be found in a blown energy-saving lamp. In the photo, a dinistor in a blue mug.
Just in case, I checked the other details, although I was sure of their serviceability, since the triac and, more rarely, the dinistor and a variable resistor with a switch fail. Well, it happens, of course, that the track burns out, this happens due to a short circuit in the circuit section of the bulb and the regulator or incorrect wiring of the wiring in the junction box, but it burns out already when the triac fails. By the way, some dimmers do not work correctly if the phase with zero is not connected correctly, but even if mixed up, it’s okay not to happen.

In the photos below, you can see the minimum and maximum filament of the light bulb after repair.


And actually the video of the dimmer. My advice to those who decide to repair a non-working regulator on their own. I do not recommend neglecting safety measures and performing all manipulations with the dimmer only when the power is off. When measuring under load, be careful, as the entire circuit does not have galvanic isolation. When choosing a triac, buy it at least 30% more powerful than the connected load, and preferably 50% or more (in some cases, you will have to change the circuit). Do not be lazy to check the other details, because there are not so many of them there, in my scheme there are only 7 together with the triac. It happened to me personally, they brought dimmers, in which there were failed switches themselves, built-in to the potentiometer, triac, or dinistor, but in principle the other details may refuse to work.
Hopefully someone repairing the dimmer, my information will help.
Share
Pin
Tweet
Send
Share
Send