Share
Pin
Tweet
Send
Share
Send
I got into the hands of a non-working set-top box of satellite television tricolor DRS-5003, they presented it to me when it broke, its former owner just bought a new one. The receiver broke down, as my friend said, not silently, as is often the case when, for example, the firmware flies, it dries, or capacitors swell, the fuse blows, etc. He said that he heard cotton, and my first suspicion was that a capacitor had burst in the power supply, decided to reanimate it (as they say, an autopsy will show what happened there).
When I opened it, I saw a terrible picture, some details of the receiver were even invisible due to dust.

First of all, I took a closer look at the fuse, although without opening it was clear that it was blown, then it was a fuse so that its thread would melt as quickly as possible until serious damage to the device and home electrician occurred.
Having unscrewed the board, the power supply found the place of a "mini explosion". In the photo below, a fuse was marked in red, and a spot on the substrate near the "epicenter of the explosion."


Using a vacuum cleaner and a brush, I cleaned the receiver from dust. It is dust that is often the cause of electronics breakdowns.

After cleaning, I discovered a place where rations of rations of several parts were damaged due to moisture, cleaned, half-soldered flux and re-soldered them until they completely fell off and the oxides did not pass the parts together.

The bottom photo shows the actual place where the track on the board burst. First, I wiped this place with a cotton swab moistened with alcohol, as there was a black spot there, partially cleaned the paths from the varnish, hit it with a solder flux and soldered a piece of wire, so I restored the track. Then he assembled, replaced the fuse, turned on the prefix in the network, and everything worked as expected.

Everything turned on of course, but the buttons on the console panel had to be pressed hard, I forgot to take the remote control, and I love it when everything works as it should and decided to clean it at the same time. Of course, they would have to be replaced, but since the nearest electronics store was a hundred and fifty kilometers away and there was no “donor" in spite of it, I just had to clean it up for now.

First, I unsoldered them from the board, then disassembled the buttons. The photograph shows how the round plate darkened. Gently cleaned all the contacts, including the record.

After cleaning.

And he gathered all this economy back in this glue helped me. To prevent everything from peeling off, he slightly bent the iron frame at the back.


Of course, this is a temporary option, but as we know, there is nothing more permanent than temporary. In the same way, I cleaned the mouse buttons and for more than a year they did not bother me. The main thing is not to scrape off a thin layer deposited on the contacts, and the plate otherwise they will oxidize much faster.
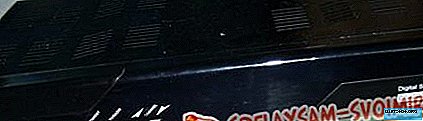
This is actually the result of my labors.

Share
Pin
Tweet
Send
Share
Send