Share
Pin
Tweet
Send
Share
Send
For work you will need:
multi-colored felt;
thread "floss" in the color of felt;
patterns of representatives of the fauna, which can be made independently or use prepared ones;
holofiber for filling toys;
needles, pins, scissors, a tool for stuffing a filler, a felt-tip pen for transferring patterns to felt;
beads for the eyes.
And also remember the looped and hidden seams, the seam for sewing tags, the French knot, which can be used to replace beads for the eyes.
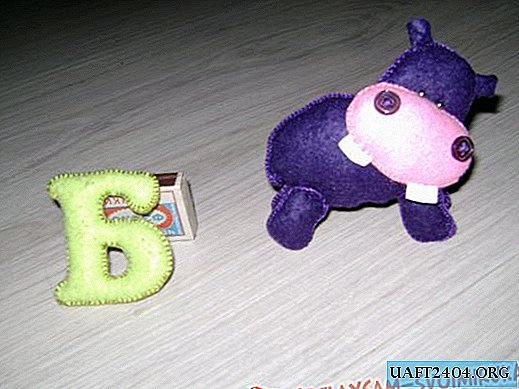
The main stages of work will be considered on the Hippo, symbolizing the letter "B".
We print out the pattern. No printer - it doesn’t matter, we set the desired size on the computer and transfer it from the screen to thin paper such as tracing paper. Cut out the details.
We select the felt and thread of the desired colors. Show your imagination, let the new toys of your children be bright and unusual.

We lay out the patterns on felt as economically as possible, we outline the outline.

We cut out the required number of parts: 1 - the upper part of the head - 2 pcs., 2 - the lower part of the head - 2 pcs., 3- the ears - 2 pcs., 4 - the body - 5 pcs., 5 - the legs - 8 pcs., 6 - teeth (from hard felt) - 2 pcs. Do not throw away small pieces of felt, tiny details can be cut out of them, and very small ones can be used when working on a collage.

Sew the parts with a buttonhole. I used the floss in 6 additions. First, the trunk and legs, leave a small area of each part of the body unstitched for filling with holofiber.
When stitching the details of the upper part of the head, we sew in the ears with a seam for tags. When working on the lower part of the head, teeth. The ears need to be wrapped a little inside before being sewn in, then they will charmingly stick out, like a real hippo.

On the lower part of the head we sew small buttons-nostrils or draw them with a marker (embroider, sew small felt circles). Then sew the lower part to the upper blind seam. We sew black beads - eyes (we look at the location in the photo). Eyes can also be made using a French knot. I thought that black nodules would not be visible on the dark purple part of the head, there were no black beads at hand, my husband suggested trying small metal beads. It turned out great.

Rear view of the head.

We sew the legs to the body in a button-like manner (in this way buttons with holes are usually sewn) and the head with a hidden seam.

So the letter “B” got its little felt addition. A hippo can not only lie on its side, but also stand on its four legs. It remains to learn a couple of small poems about the animal and the letter "B", and you can start entertaining educational games with the child.
Who is a hippo?
He has a big belly
His eyes are big
Glorious ears such
He lives in a pond, -
There he hides his stomach.
Pleasant crafts from felt. Visit us more often, there is a lot of interesting things ahead!
Share
Pin
Tweet
Send
Share
Send