Share
Pin
Tweet
Send
Share
Send
To make such a device, we need:
• Chipboard sheet measuring 150 * 50 cm
• Jigsaw
• Wood screws (12 pieces)
• Screwdriver
• Building corners
• Roulette
• File
• Foam rubber sheet 10mm thick
• Dermatine or skin
• Furniture stapler and staples to it
• Pencil is simple
I suggest first to make an approximate drawing of the product that you want to get as a result. Next, go to the measurements: shelf length, height and width. When my husband and I took up the development of this update of our car, I was engaged in drawings, measurements and other technical aspects, fortunately, special education allows. The length of our new shelf was 143 cm, its width was 20 cm, height - 10 cm. In the drawing, all measurements are clearly visible.
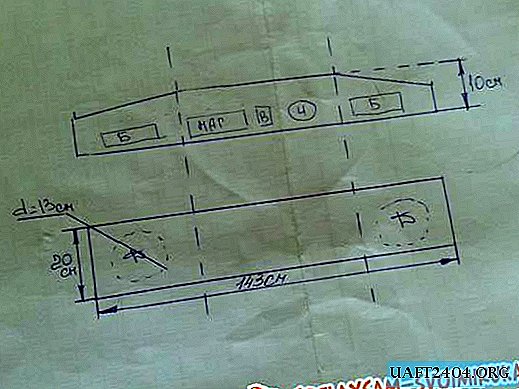
Letters marked:
• B - glove compartment (2 pcs.)
• Mage - radio
• B - interior light switch
• H - hours
• D - Speakers
In this shelf we decided to put a radio with speakers, a tank clock, a light switch in the cabin, we also wanted to add a glove box in which you can store a phone, a camera and other trifles.
We transfer the dimensions to the chipboard and cut it out, all that is necessary, if the holes sawn with a jigsaw do not fit, we modify them with a file. Then we fasten the shelf with corners and screws on the tree in order to give it the necessary rigidity.


Now you should beat the shelf with foam rubber to give it softness, armed with a furniture stapler, I set to work. She started tight-fitting from the bottom of the shelf, it was more convenient. She pulled down the bottom, cut out the holes for the speakers and attached the edges with the same stapler.

Then she pulled it over the front of the shelf, which is what eventually happened.

The main thing here is not to attach brackets, because the upholstery material that will be on top will be attached to the brackets, and those located on the foam will interfere.
We tighten the finished shelf with foam upholstery, we had it in tone with the ceiling (which, by the way, I also sewed). The shelf is ready, it remains only to conduct all the wiring to the electronics and connect it. We put a shelf on the corners: one corner on the sides and two on each side of the windshield, we install a radio.
Now in our car the music is pouring from above, the radio is standing overhead, there is time on the clock and glove compartments where you can put the little things you need while fishing.

Share
Pin
Tweet
Send
Share
Send