Using this tool to grind manually various wooden or metal surfaces will be much more convenient and easier. And you can do it yourself in literally 10-15 minutes.

As a basis for this homemade product you will need an ordinary plastic brush with bristles, which is used to clean various surfaces in the bathroom and in the kitchen. You can buy a new one, but in order to save money, it is better to use the old one, which has already worked out its "resource".
The main stages of work
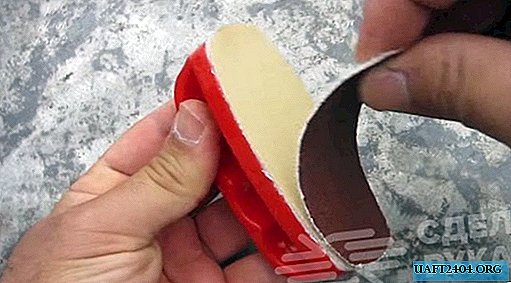
To begin with, you need to remove all the bristles from the inner surface of the brush, using ordinary pliers or another improvised tool for this. Then we glue two strips of double-sided tape on the “bare” surface and cut it along the contour of the plastic brush.

The next step is to attach an adhesive paper backing to tape. Next, you need to cut and glue sandpaper on the substrate. It is advisable to cut several such blanks at once in order to quickly change them if necessary.
Useful Tips
To work with this tool is as simple as possible - we glue the emery “nozzle” of the desired grain size onto the “sole” of the brush and you can proceed to grinding. Thanks to the convenient handle, grinding is much easier than using just sandpaper.

If you are going to process wooden or metal surfaces, it is advisable to use sandpaper of medium or large grain size. But for sharpening knives, fine is more suitable. Having made different "nozzles", you can make the workflow as comfortable as possible.