Share
Pin
Tweet
Send
Share
Send
What you need to prepare
The handle is made of PET bottle caps. They need a sufficient amount of the order of 30-50 pcs. Fixture for pouring - easily made of wood in the shape of a future handle, 3-4 clamps are needed to fix its position. Baking paper.

Handle manufacturing process
Before starting work, it is necessary to prepare a device for molding the handle, a kind of elementary press. It is made of wooden slats, the length should be equal to the size of a hammer with a metal handle, the width to the desired thickness. From the strips, make a U-shaped box, from one end install a jumper with a hole for the metal handle, the second end is deaf. The mold is ready.

Put baking paper on a baking sheet, and 15-20 bottle caps on it. Set the oven temperature to 150 degrees Celsius.

Roofs can be made of HDPE or LDPE, the melting point of these plastics is 100-130 degrees Celsius. The heating process must be visually controlled, the polymer should not completely melt, but only soften.

Constantly monitor the condition of the covers. As soon as they begin to melt, take out a baking sheet and put a new batch on it. You can’t put a lot at once - while the lower ones will warm up, the upper ones will completely flow.

Repeat several times, you will need a lot of covers. If the plastic goes beyond the paper, then with a knife carefully return it to its original place, it should not touch the baking sheet - it will burn.
Remove the molten plastic from the oven and place it in the cooked mold.


Insert the metal handle of the hammer into the polymer, with any stick, smooth the surface of the plastic as accurately as possible. Fill all the voids to the maximum.

Put the board on top and clamp it firmly against the shape. It is necessary to clamp with great effort - the plastic should completely fill the volume of the form, and the excess should go into small gaps.


Leave the mold for several hours to solidify. Disassemble it and take out the hammer with a plastic handle.

Remove the baking paper, align and round the edges with a knife and file.

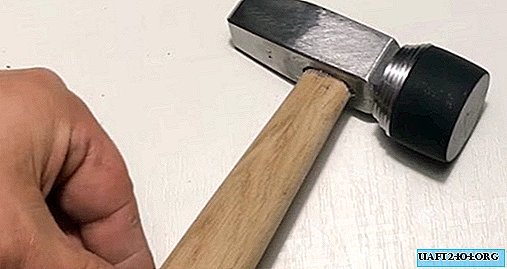
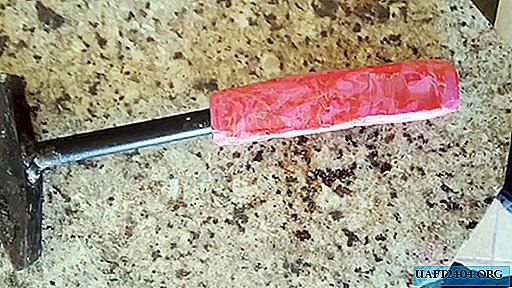
The hammer with a plastic handle is ready for use as intended.
Conclusion
Using this technology, you can make durable and safe handles for many hand tools. Plastic perfectly dampens shock loads, working with it is easy and convenient.
Share
Pin
Tweet
Send
Share
Send