Share
Pin
Tweet
Send
Share
Send
The most expensive part of the whole structure is natural linear actuator (actuator). That is what it is called if you suddenly want to repeat this miracle. A linear actuator or actuator can be found on ALI EXPRESS at a very normal price - HERE.
As for everything else - everything is available in a hardware store or you can do it like me - disassemble an old unnecessary cupboard and take the guides from there.
Let's get started!
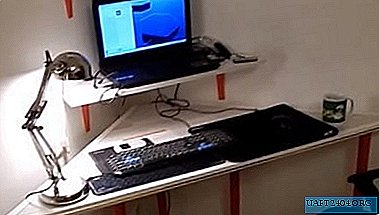
To begin with, we measure the TV or your monitor, under which we will make the system of raising and lowering. Then you need to cut a rectangular hole in the beggar of your kitchen set with a large margin, so that when moving nothing hurts.


I will say right away that this hole through which the monitor leaves does not close with anything and is always open. I thought it was not necessary. But if you want, you can make a kind of door on a spring so that the monitor clicks on it when leaving, and it opens.
We fix guides
Now secure the slide rails. They must be fixed strictly parallel to each other, otherwise there will be no easy descent.

In the monitor or TV at the back, you need to attach a warp that will connect the guides and the TV body. I took a piece of plywood.


We try on and drill holes for the guides and the TV mount. It is also possible to base a hole for attaching a cable to this base.
Linear actuator mount
It came to mounting a linear actuator. It is attached to us on the second floor of the cabinet and lifts the entire structure by a cable.


This support was included with the drive. In principle, nothing more is needed. The drive simply lies, secured only on one side. I will temporarily power the entire system from the battery.


Cable connection.


Naturally, you can take any rope instead of a cable, but keep in mind that the cable has a longer resource, although there is enough rope for many years. It is only necessary to drill a hole and install a support so that when moving the cable does not rub the hole. We skip everything and tighten with screw ties. If you use a rope, you can just tie a knot.


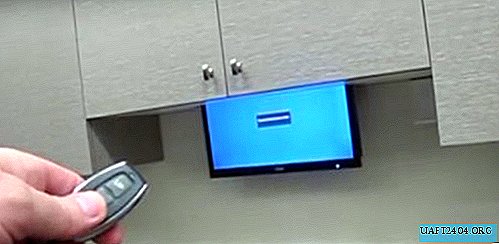
Electronics for remote control.
The remote control mechanism is controlled by an electronic relay. I bought an electronic remote control relay in ali - HERE. Or you can see HERE.
This remote control should provide reverse drive. That is, to change the polarity, so that the slide would rise and fall.
It is necessary to connect as follows.

We connect all the electrics and check.
If necessary, adjust the cable length. If everything suits you, we enjoy it.
Now you will love your home even more for such unusual functionality that will bring you comfort and joy of use every day.

If you still have questions - write in the comments, I will be happy to answer them. I will also be glad to your criticism and suggestions.
All the best.
Share
Pin
Tweet
Send
Share
Send