Share
Pin
Tweet
Send
Share
Send
For the manufacture of cards you will need materials:
1. The cardboard is pink.
2. Scrap paper.
3. Double-sided paper in red and green.
4. Half beads.
5. Decor in the form of a ladybug.
6. Scissors, glue gun and a simple pencil.
7. A stencil with a congratulatory inscription.
8. Double-sided tape.
9. The color pencil is green.
10. Curly scissors.
The process of making cards.
1. The first step is to prepare the basis for the manufacture of postcards. For this, a sheet of colored cardboard must be bent in half and measure on it a square measuring 15 * 15 cm. We cut off the excess.

2. We measure the scrap paper so that it is less than the main sheet by 0.5 cm from each edge. The edges of the paper are cut with curly scissors.

3. We attach the scrap paper to the cardboard blank.

4. From green paper, a circle with rounded edges (in the form of a flower). This element should be larger than a round blank with a congratulatory inscription.

5. Using glue, we fix the circle with the inscription to the green flower.

6. The resulting decorative element is fixed on a double-sided tape in the center of the postcard.

7. Cut the leaves. Draw on the vein leaves with a colored pencil.

8. Next, we begin to manufacture paper roses. To do this, cut 12 blanks for flowers from red double-sided paper. From such a number of blanks, 3 roses will turn out. We carefully lay the blanks on top of each other to get a stack.

9. We drop a stack of flowers in water and moisten them well. The paper should be saturated with water, but not soaked.

10. Wet flowers are laid on a towel.

11. Proceed to the design of the petals. To do this, using a teaspoon, we will bend each petal. So, we make pressing movements with a spoon from the edge of the petal to the center. Repeat this movement several times for each of the petals.

12. The resulting curved flowers are left in a pile until completely dry.

13. After the petals are completely dry, gently separate the flowers from each other.

14. Next, we proceed to the formation of the rosebud. We take one flower blank and in the center of it we fix a paper ball.

15. One of the petals wrap the ball, while fixing the petal with glue.

16. The opposite rose petal is also fastened around the ball.

17. The remaining petals are wrapped to the center and glue them in the same way as the previous petals.

18. Next, spread the resulting bud on the next blank. We fix both flowers in the center. Then we collect all the petals of the new flower into a bud and fix them.

19. The third blank is attached to the previous ones along the edge of the petals. In this case, we unfold the flower with bends down.

20. The last flower is fixed similarly to the previous one, but in a staggered arrangement of the petals.

21. As a result, we get 3 volumetric roses.

22. We proceed to the assembly. First, glue 3 leaves in the far left corner of the postcard.

23. Next, glue the roses. Around the roses we also glue the leaves.

24. In the 3 corners of the postcard we fix the pink beads.

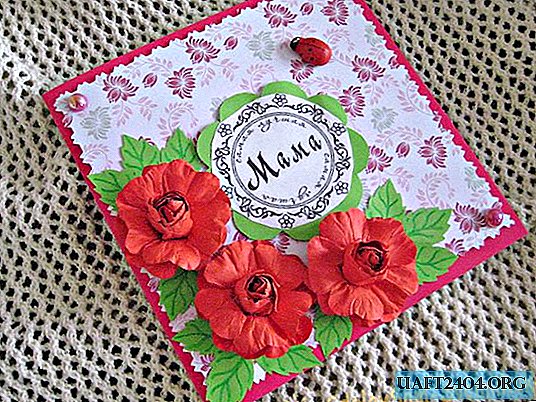
25. At the top of the card we fasten the ladybug.

26. Postcard for mom is ready! It remains only to issue a congratulation inside the card.

Greeting card, made in the style of scrapbooking, will surely please your mother and will be appropriate for any holiday.


Share
Pin
Tweet
Send
Share
Send