Share
Pin
Tweet
Send
Share
Send
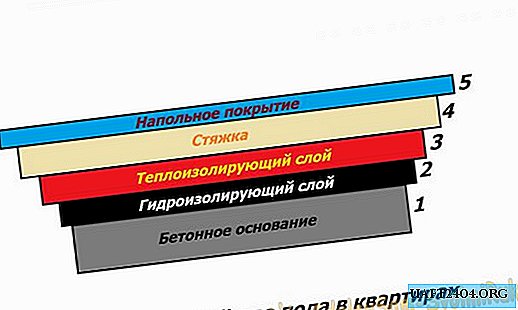
The structure of the flooring.
Standard flooring in apartments mainly consists of the following layers:
- reinforced concrete base (slab);
- waterproofing layer (bitumen, roofing material);
- noise-insulating layer (expanded clay, granulated slag);
- screed (cement, cement-lime);
- flooring (linoleum, tile).
All significant changes that occur in the layers affect the condition of the screed.
Consider, for example, the possible causes leading to the emergence of a certain type of defect.
Causes of damage to the screed.
Each damage has a specific cause. The following defects exist:
1. Abrasion of the surface.
Occurs in floors cast from substandard materials. The top layer is always covered with cement dust.

2. Cracks and potholes.
They are formed during the deflection of the main plate, the destruction of the insulating layer, insufficient thickness (less than 30 mm), when laying a cement-sand mortar on an improperly prepared base, in the absence of expansion joints.


3. The bundle.
It appears if the filling of the common layer was carried out in several stages, while the surface was poorly cleaned.

4. The porous structure.
Present in those floors that were flooded with a solution with impaired density.
Screed repair methods depend on the type of defect. The most common damages include cracks, chips, delaminations and hidden voids. If the floor structure is disturbed by more than 30%, it must be cast again, at lower values it is restored.
Crack repair.
Using a chisel and a hammer, deepen and widen the crack. With the help of a construction vacuum cleaner or a broom soaked in water, the resulting debris and dust are removed. The clean surface is abundantly moistened with a solution made of epoxy primer and solvent in a ratio of 1: 10. This way provides good adhesion between the damaged base and the applied element. After the primer dries, a mortar is laid in the treated slot with a spatula, and the solution is aligned with the relief of the floor.
Repair of moving parts of the screed.
Several nearby deep cracks can form a free segment, which will stagger, fall through in a solid floor canvas. Such areas are not poured with mortar on top, but are dismantled and restored.
Procedure for repairing damage:
- a chisel and a hammer, gently, around the entire perimeter of the movable element, cleave the edges, for free removal from the coating;
- when the piece is removed, large debris is removed in the vacant opening and cleaned of dust;
- for strong adhesion of the new solution with the old one, a reinforcing layer is fixed to the bottom or in the middle of the defective place, which may consist of a metal grill, rods, etc .;
- re-clean the place of dust;
- several times covered with a primer (the recipe for preparation is described above);
- make pouring cement-sand mortar in a ratio of 1 to 3;
- the surface is leveled and smoothed with a spatula at the floor level;
- to harden the top layer, a fresh, leveled mortar is covered with a thin layer of cement.
Elimination of stratification.
If the thickness of the outgoing layer is small, it is dismantled, the surface is cleaned, primed and covered flush with the floor with a self-leveling mixture. If the stratification has penetrated deeply, then determine the size of the defect, cut it down and perform the same operations as in the repair of moving parts.
Removing voids.
When there is a deflection of the main plate, aging of the insulating layer or mistakes are made during the installation of the floor, voids appear under the screed. They contribute to the appearance of such a defect as cracks. To eliminate the void:
- with a hammer or metal rod, with a blunt tip, tap the surface to determine the location of the void;
- outline the detected defect with a pencil;
- holes are drilled at the designated points with a diameter of 16 mm at a distance of 200 mm from each other;
- using a construction syringe, gradually fill the voids with a repair filler of low viscosity;
- after the injection, the repair hole is closed.
When drilling holes in the screed, remember that this must be done carefully, just as electric cables are placed under it.

Surface hardening.
Due to daily stresses and poor-quality materials, the screed becomes thinner and dusty, even if it is under the floor covering. To prevent dusting of the surface, special hardening impregnations are used. They are applied with a roller on a perfectly clean base. They are selected depending on the loads that act on the floor.
Leveling the base.
To lay a floor covering such as a laminate, the screed must have slight differences in height. But in reality, few owners can boast of the evenness of their sexes. The photo shows an example of a typical, for apartments, deflection.

It can easily be eliminated if you use a self-leveling mixture.
Fill Order:
- qualitatively clean the surface of dust;
- wash the floor with soda solution at least 2 times;
- moisturize;
- the mixture is applied in small portions and evenly leveled;
- with the help of a needle roller, the composition reduces the concentration of air bubbles.
The floor can be leveled with OSB sheets from 12 mm thick. For this:
- clean the base of debris, the old floor layer, dust;
- the middle of the deflection is leveled with sand;
- OSB sheets are closely stacked and fixed to the floor, leaving a gap of 10 mm between the wall and the slab, around the entire perimeter;
- differences between sheets, polished or covered with fiberboard.
Share
Pin
Tweet
Send
Share
Send