Share
Pin
Tweet
Send
Share
Send
I would like to talk about my small repair, which, in the end, made my whole family happy. The boring brown color did not inspire at all, and I wanted to give our bedroom a little romance, light and bright colors that help to improve our mood. So let's go.

The first thing we started with is a thorough cleaning of the walls from numerous layers of old wallpaper. I can say that this process requires a lot of patience, because even small particles need to be removed from the walls. To improve the separation of paper from the walls, you can use both ordinary water and special fluids. In our case, we intensively wetted the walls with warm water, waited a little, and removed old wallpaper with spatulas.

After long labors, our walls looked just awful, traces of the old stucco, which was never brought to the "mind", were visible. There is no way to do without alignment and the next stage was as follows.


To avoid fungus, mold and other troubles, the walls just need to be primed. We used a deep penetration primer.

After all the walls, corners have already been thoroughly primed, and dried up, you can proceed to the next step: if necessary, plaster the walls, if not (as in our version) it is enough to use putty.

We used both a classic putty and a finish to hide the small bumps in the walls. All cooking steps are indicated by the manufacturer on the packaging. In certain proportions, mix the dry putty with cold water and mix thoroughly.

Further, following all the rules, we apply the mortar with a trowel and putty knife on the wall, pressing on the spatula itself, dispersing the solution up and down, left and right, going from one wall to another. You should know that for quality work, especially in the corners of the room, you need to use two spatulas of different sizes.

After all the walls have been thoroughly plastered, and have already dried, we set about laying the floor.

Since it was laid by boards, we decided, before laying linoleum, to level it with hardboard. Of course, for high-quality alignment, you need to use denser and thicker materials such as fiberboard or plywood, but for a young family with a limited budget, hardboard can also be suitable. Carefully nail it to the boards so that it does not "walk" underfoot.

The next step will be the laying of linoleum. The color chosen was beige with a plain pattern to make the room bright. I can say that this is not a complicated process at all, the main thing is that the linoleum is not “cramped” and the edges are not pressed into the walls, otherwise instead of a flat floor you will get ugly waves.


After the work, the room began to look fresh, clean and bright. And we proceeded to further ennoble our bedroom.
Sticking wallpaper and photo wallpaper. It was decided to glue the wallpaper on its larger side, which is adjacent to the window. To begin with, as written in the instructions, you should make markings on the wall: these are straight lines intersecting at one point in the middle.

Measured them using a construction line and level. A little effort and diligence and a piece of nature is already pleasing to the eye right at your home.


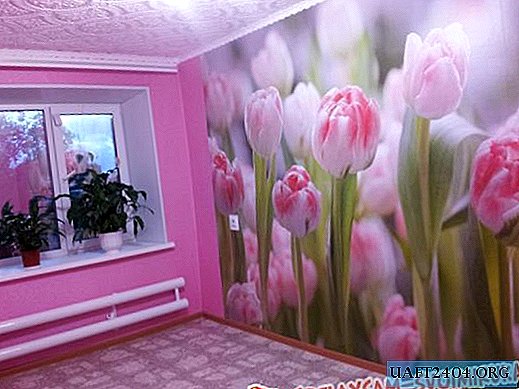
There were no problems with the choice of photo wallpaper, I wanted something gentle and beautiful, but what could be more beautiful than flowers? I want to say that the idea of the style and color scheme of the room arose precisely from the picture on the photo wallpaper.
Glue wallpaper. For better gluing, you must use a special glue suitable for a particular type of wallpaper. In our case, non-woven wallpaper and, accordingly, glue selected for this type.

Glue wallpaper without overlapping each other.

We started gluing from the door, since the door is level, and there was no need to draw the layout of the first sheet on a plumb line.


Proceed to the ceiling. We chose the German tile "Format" (the "Rhapsody" picture), which allowed us to quickly and easily decorate the ceiling. The main advantage of this tile is that the seam is almost invisible and looks very nice.

The final touches in the repair were work with ceiling and floor skirting boards.

Skirting boards and threshold are chosen to match the door in the room.


The result was a repair that beyond recognition changed our bedroom. Estimate yourself.


We wish you all successful repairs!
Share
Pin
Tweet
Send
Share
Send