Share
Pin
Tweet
Send
Share
Send
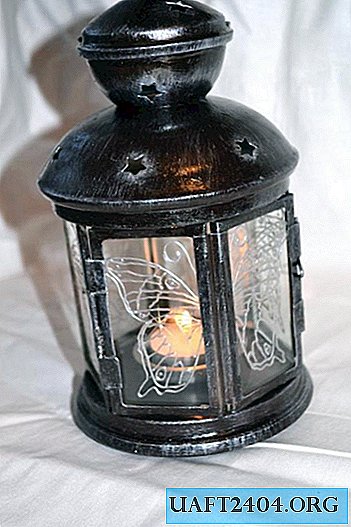
Candlestick in the form of a flashlight is an original decoration of the interior. In the darkness of the room, the flashlight leaves bizarre shadows on the walls and ceiling - in the form of stars, as well as in the form of butterflies painted on glass. Decorating it is very interesting and not difficult.
So, what materials do we need to prepare for work?
1. Blank candlestick in the form of a flashlight in white, gray or any other color.
2. Soil, best transparent.
3. Acrylic paints and a silver outline on glass.
4. Pliers to remove the glass.
5. A medium-sized flat synthetic brush and a coarse large brush.
6. Acrylic matte or glossy varnish.
First step. To work on the flashlight was convenient, you must first remove all the glass from it. To do this, use pliers, bend the metal holders and gently pull out the glass. After this, it is advisable to wipe the glass so that there are no stains and fingerprints.

Now our candlestick can be primed without fear that the soil will stain glass. We take a flat synthetic brush and cover the entire flashlight with soil, both outside and inside. Leave to dry.

Second phase. While the soil dries, you can do glass. In this workshop, butterflies were drawn on glass with a silver outline. But you can choose absolutely any pattern. We select a suitable pattern from the Internet, reduce the image to the size of the glass and print it. If there is no printer at home, you can translate the image with a pencil from the monitor screen or even draw it yourself.

There are six glasses in total, on each of them you need to draw half a butterfly, which then will form three whole butterflies. We take the picture, put it under the glass, and on the outside of the glass we outline the translucent image.

So we draw a butterfly outline on all six glasses and leave them to dry for about 12 hours. The drying process can be accelerated with a hairdryer if desired.

The third stage. We return to our lamp. Now that the soil has dried, the candlestick can be painted with dark brown acrylic paint. We stir the necessary shade on the back of the plate and paint the entire flashlight outside and inside with a flat synthetic brush.

When the paint dries, squeeze a little silver outline on the clean plate-plate with which we painted butterflies. Take a coarse large brush, dip in silver paint and move the brush over the palette to get rid of excess paint. Please note that the brush must be absolutely dry - this is the only way to get the effect we need.
We walk with a brush around the candlestick, highlighting the protruding places and leaving thin strips of silver. This will give our blank a noble aged look. Stars can be highlighted especially by walking around them with silver paint.


The fourth stage. After the paint dries, we cover the candlestick with acrylic varnish and wait until it dries. The varnish completely dries in 24 hours, but ceases to be sticky after a few hours.

When the varnish dries and the butterflies dry out, the glass can be inserted back. Pliers or any other metal improvised tool that seems convenient to you will also help us with this.
That's all, the glass is in place, the flashlight is ready. Now you can install a candle inside and enjoy its beauty.


Share
Pin
Tweet
Send
Share
Send